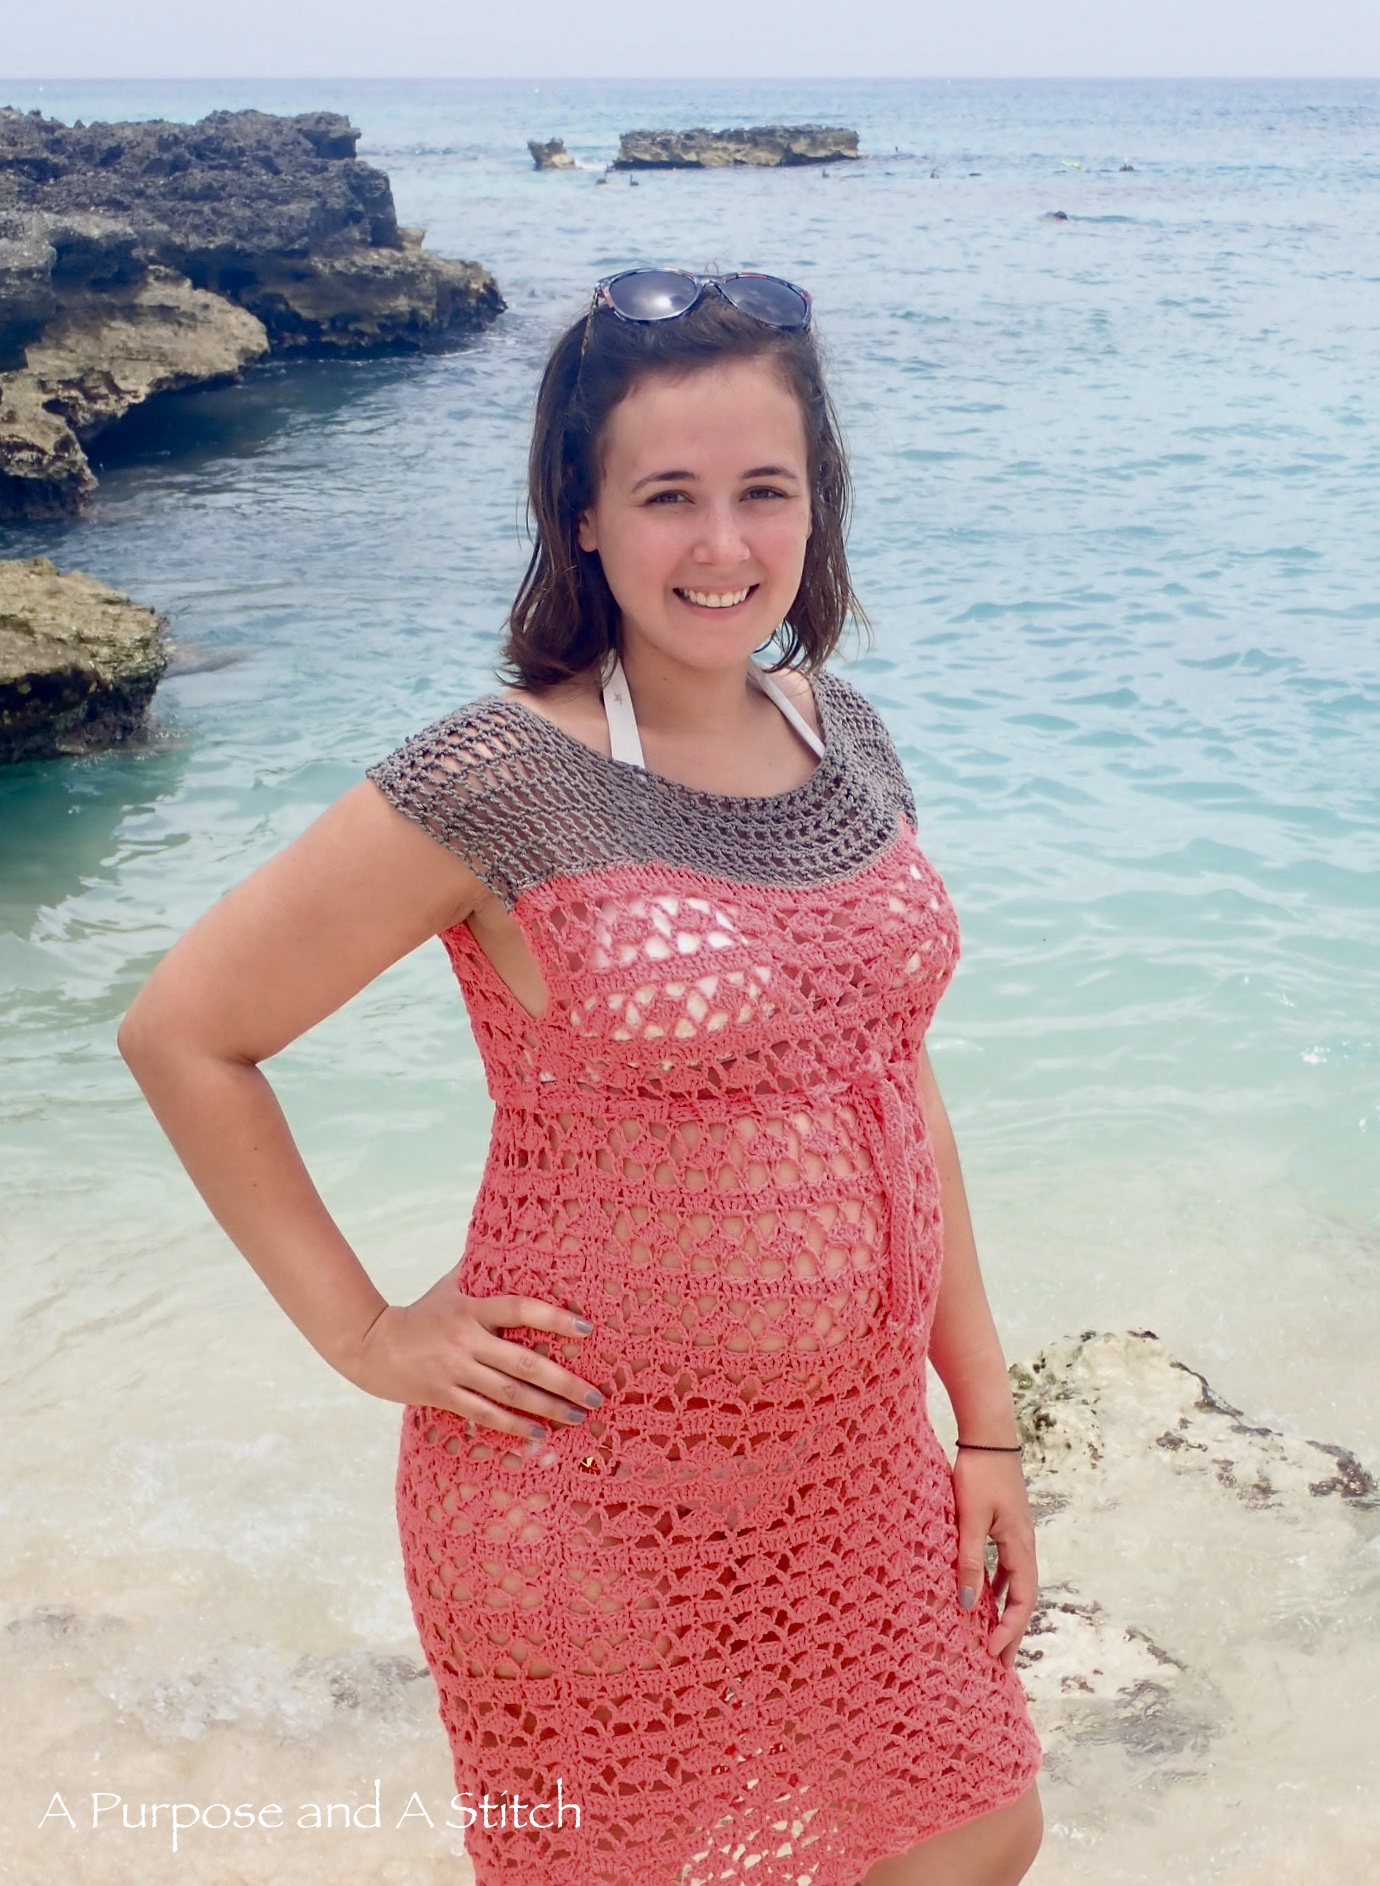
Sea and Shells Beach Dress- Free Pattern

It’s been almost a decade since Will and I started planning our honeymoon, and our number one criteria of the destination was that it had to have beautiful waters and good snorkeling. We were blessed enough to be able to go to Bora Bora and that trip still feels like it was a dream. It was my first time really snorkeling and now I cannot get enough!
Since then, almost every vacation we have planned and been on has revolved around beach hopping and snorkeling. That being said, we haven’t been to the ocean for a few years so when we starting planning our trip to Grand Cayman, I could not wait to use my rediscovered obsession of crocheting to make a beach dress for the trip.
I knew I wanted it to have a lace-like look, with a lot of give and flow for my growing baby bump. A few days after figuring out the details of when we would go, I went to both Michael’s and Hobby Lobby in search of the perfect yarn to use. When I found Lion Brand’s new ZZ Twist on the shelf at Hobby Lobby, I knew I had found the perfect yarn! Audrey did too… she pilled skein after skein into my basket telling me that she was “helping”, even adding in a beautiful taupe skein to compliment the coral…all on her own, it was pretty awesome! Haha!

I cannot sing high enough praises of this yarn for crocheting. The way that it has been spun works like magic with the twists and turns of your crochet hook making it drape like no other and incredibly easy to work with. (It should be noted that this is my personal opinion- I have not received anything from Lion Brand for recommending their yarn in this pattern, I just really like it that much). If you cannot find Lion Brand’s ZZ Twist yarn, or would rather use something you have on hand, I would highly recommend at least using a “z twist” acrylic yarn to get a similar give and flow of the pattern.
The entire time I worked on this dress I had struggled with how exactly I wanted the dress to look. I was torn between doing a spaghetti strap dress, and a dress with shoulder sleeves. When it was all said and done, I liked the way the dress with shoulder sleeves looked on my figure best, so that was the route I went.

This dress is much easier to make then you might think! Once you get the hang of the stitch pattern, it’s just two large rectangle panels that you stitch together on the sides and shoulders. It’s meant to be slightly oversized, so make sure to look at the measurements provided and adjust accordingly if you would like a more or less fitted dress.
To get started on the first panel, you will need to chain the appropriate amount of stitches for your size. We’re working into the hundreds for this, so make sure you keep good count, the stitch needs are very specific for the pattern to work.

From here you will work a row of single crochets across and turn your work. Once your foundation row is all set, you’ll begin to work the Mesh and Shells crochet stitch. To complete this dress, you will be repeating this stitch for the majority of the dress. The amount of rows and repetitions will be dependent on your size. I recently wrote a tutorial on completing this stitch (found here), so make sure you check that out before starting this dress.

Once you are almost to the top of your dress, you will end on the double crochet 4 row (step 3) of your Mesh & Shells stitch. Then you’ll switch over to your taupe color, and switch to an open mesh stitch.
Before starting the mesh stitch, you will need to single crochet across the row, one single crochet into each double crochet of the row previous, decreasing in either your very first or your very last 2 double crochets (to get to an even number of stitches).


The simple mesh pattern is super easy, super fun, and super mindless (my kind of stitch… lol). It is worked in double crochets, with a chain 1 and skip 1 in between each double crochet. So to get things started you will chain 4 (this counts as a double crochet and a chain 1), skip one single crochet and double crochet into the next. Chain 1, skip 1 and double crochet in next, repeating across the row.

On the following row you will do the same thing, by chaining 4, and working 1 double crochet into the first double crochet, chain 1 and work another double crochet into the next.
 Make sure you double crochet into the 2nd ch of your chain 4 that started the previous row. If you don’t you’ll loose a stitch, your edges will be all wanky and you wont be happy with me. 😛


Once you have reached the length needed for your size, you will fasten off leaving a long tail. You should now have one large rectangle. Repeat this process to get a second large rectangle, making sure to leave a long tail when fastening off.

Assembly of this dress is as simple as crocheting it was! You’ll use the long tails left from your top mesh to stitch the top together, and a long strand of your coral color to stitch the sides together.
Make sure to face the front sides together on both rectangles before getting started on stitching it all up. You will be able to see the right from wrong side in your shells. The shells will look cleaner and be ever so slightly pushed forward on the right side of your dress.
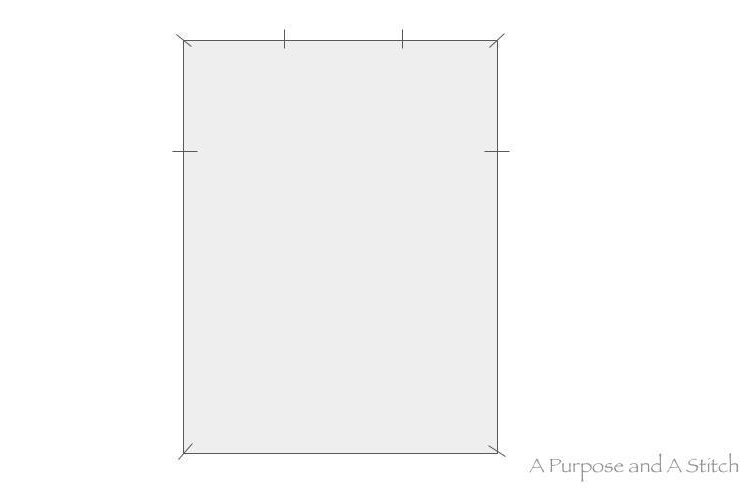
Line up all 4 corners of your dress and get out your stitch markers and measuring tape. Place stitch markers in the appropriate place on the sides and across the top based on your size.


There should be a stitch marker at the bottom of each side of your dress, right underneath the armholes on the side of the dress, at the very corner of the top of each side of the dress, and one on either side of where the neck hole will go across the top. A little something like this:
I used the mattress stitch to seam it all up. If you are unfamiliar with this technique, I really enjoyed using Chi Wei’s tutorial over at One Dog Woof, which you can find here.
Once your edges are all stitched together accordingly, you will fasten off and weave in the ends. It’s seriously that easy! You now have a super comfy, super breathable and super pretty beach dress!
To add a belt (as I did for my baby bump), you will simply work a rather long chain row, with one row of half double crochets across and fasten off.
 To add it to the dress, I put my dress on and found the “double crochet 4 row” below my bust and placed stitch markers where I wanted the ties to come out of.
 I then weaved the belt in and out of that row so that the ends came out of the front of my dress for tying.
  Feel free to add this belt to a different location if you choose to as well! It’s a super easy modification that really adds to the dress if you so choose, depending on your body type!

This belt was actually an after thought to me while we were on our vacation and I was wearing this dress daily. Since I had only packed some of my coral color yarn, that’s what I used for my belt, but I think it would be just as cute, if not cuter to make the belt in the taupe color as well! Either way, have fun, make it your own and enjoy!


Model above is 5’6 wearing a size medium


Model above is 5’7, 25 weeks pregnant wearing size medium
Sizes Available: X-small, Small, Medium, Large, X-Large, 2X-Large
 Sizing Notes
This dress is meant to be slightly oversized, but due to the yarn and stitch used, it has a lot of flow and give. The width and length may differ slightly based on your body type.
“Armhole Depth” is measured from top of shoulder to bottom of armhole opening, “Total Length” is measured from the top of of the shoulder to the hemline
This pattern is made up of of 2 rectangles, so the “Width” is the circumference of the dress at any one spot (hips, bust, waist, etc).
To adjust the length to your size, you will simply work more or less repetitions of the shell mesh stitch portion of the rectangles.
What You’ll Need
Lion Brand ZZ Twist Yarn:
Coral color- 3 (4,4,4,5,5,6) skeins
Taupe color- 1 skein (for all sizes)
6.00 mm (US size J) crochet hook
Stitch markers
Darning/ embroidery needle
Measuring Tape
Gauge Used
In Coral:
20 sts (of foundation) = 4″
2.36 completed reps= 4″
In Taupe:
10 dc = 4″
7 Rows = 4″
Abbreviations Used
Sc= Single Crochet
ch= chain
st= stitch
sk= skip
dc= double crochet
sp= space
rep= repetition
dec= decrease (single crochet two together)
fo= fasten off
hdc= half double crochet
Pattern for the Dress Panels (make 2)
Foundation: Ch 92 (102, 112, 122, 132, 142)
Row 1: Sc across the row beginning in 2nd ch from hook, ch 1, turn
Row 2: Sc in first st, *ch 5, sk 4, sc*, repeat from * across ending in a sc, ch 3 and turn
Row 3: dc 2 into first sc, sc into next ch 5 sp, *ch 5, sc in next ch 5 sp, dc 5 into next sc, sc in next ch 5 sp*, repeat from * across ending last rep with 3 dc in last sc, ch 1, turn.
Row 4: sc in first dc, *ch 3, sc in next ch 5 sp, ch 3, sc in 3rd dc of dc-5 group*, repeat from * across ending with a sc in the top of your turning ch, ch 3, turn.
Row 5: dc 4 in each ch 3 sp across. End row with 1 dc in the last sc, ch 1, turn.
Row 6: sc in first dc, *ch 5, sk 3, sc in 4th dc of the 4-dc group*, rep from * across, end row with a sc in top of the turning ch, ch 3, turn.
Row 7-63 (67, 67,71,71,75): repeat rows 3-6 (you will end on a row 5 rep). For each size you should end up with: 15 3/4, 16 3/4, 16 3/4, 17 3/4, 17 3/4, 18 3/4 total repetitions of the shell and mesh stitch. (77,81,89,97,105,113)
Row 64 (68,68,72,72,76): Switch to the taupe yarn, sc in dc (75,79,87,95,103,101) across, dec in last 2 dc, ch 4, turn. (76,80,88,96,104,112)
Row 65 (69,69,73,73,78): sk 1, dc in next, *ch 1, sk 1, dc in next*, repeat from * across, ch 4, turn.
Row 66 (70,70,74,74,79) – 69 (74,74,79,79,85): dc in next dc, *ch 1, dc in next*, rep from * across. Make sure to dc into the 2nd ch of your turning ch from previous row, ch 4, turn. At end of last row, sk the “ch 4” and fo instead leaving long tail.
Maternity Belt Pattern
Foundation: ch 182 (192, 202, 212, 222, 232), turn.
*If you plan to use belt around waist or hip area, you may need to make it longer.
Row 1: Starting in 3rd ch from hook, hdc across, fo.
Assembly
Line up both panels so that the right sides are facing each other and the wrong side is facing out. Make sure all rows are lined up and secure at 4 corners using safety pins or stitch markers. Starting with measuring tape at the top of your rectangle going down the side of your dress, measure: 6.5″ (7″,7.5″,8″,8.5″9″) and mark with stitch marker. Repeat on other side of dress. Now, use your measuring tape to measure across the top of the taupe and measure 5″ (for all sizes) and mark with stitch marker. Repeat on other side across the top. You will now use the taupe tails to mattress stitch across the top going inward towards your stitch markers. Fasten off and weave in ends. Next use a long strand of coral yarn to mattress stitch up to the stitch markers on the side of your dress. Fasten off and weave in ends, repeat on other side. See diagram and follow arrows to seam up the dress accordingly:

To add the belt, first try on the dress and find the dc-4 row of the “shell & mesh” stitch that you want to use for placement. I used the row located directly under my bust. Use stitch markers to assign where you want the tie to come out of the dress. Weave the belt in and out between dc-4 groups so that the ends of your belt are coming out of where your stitch markers are located.
And there you have it! Your very own Sea & Shells Beach Dress. If you enjoyed following this pattern and making this dress, please let me know! I love to hear from my followers!


Very nice and innovative. Keep it up.
Thank you so much! 😊