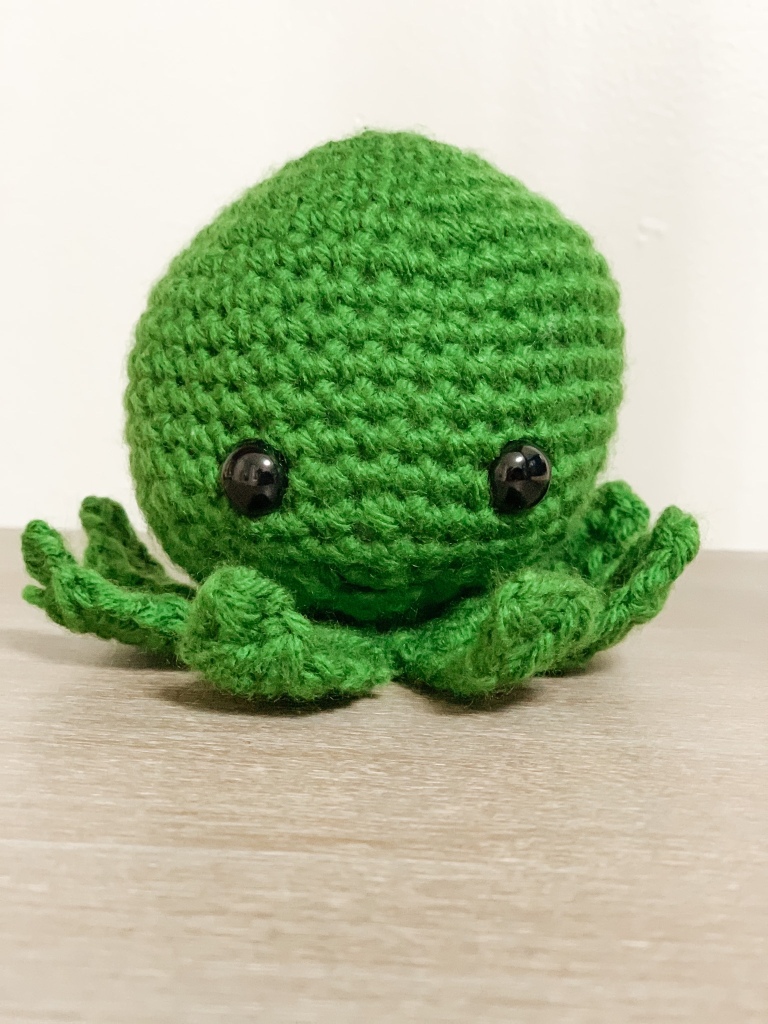
My almost-three-year old has always really loved octopuses, but her obsession with them comes and goes. One morning a few weeks ago, she woke up and said she had dreamt about a green octopus, and ever since then she has been asking for one. I finally got my hands on some green yarn and decided to try my hand at free-handing an octopus for her.
I have a bit of a love/hate relationship with amigurumi. While I love the finished products, and don’t mind making the item itself, I really detest sewing on parts. Really, truly detest it. So my aim in this was to make something that didn’t require any sewing (besides the tiny bit it takes to close up the body). I didn’t want stuffed tentacles because I knew those would have to be sewn on. So I went with a flat design that looks cute and is toddler-friendly. While the pattern is extremely simple, there is no mistaking this is an octopus, and my daughter was over the moon about it. In fact, I’ve had to make another one in purple, and she has also asked for a blue!
The first one (green) I made using a 5mm hook. When I made the purple, I dropped down to a 4.5mm hook and adjusted the pattern slightly to try to get it close to the same size. They are quite close, though the 4.5mm made it just a bit smaller. This pattern is the exact one I used to make the purple octopus as pictured, only because I felt that the spaces were a bit too large with the 5mm hook. You may adjust your hook size as desired, but if you do that you may want to add or remove rows to keep things in proportion.
My daughter named her octopus Zeus, and here is the free pattern for him. Please enjoy!
The Pattern
Difficulty: Easy
Yarn: I used Big Twist Value for the green one and Caron Simply Soft for the purple. Any worsted weight (4) yarn will give a similar look, or you can go up or down hook sizes and use a different weight yarn if you choose to.
Hook: 4.5mm hook
Gauge is not important for this pattern. Just remember to keep your stitches tight, so as to minimize any holes and keep the stuffing from poking out.
You will also need: a yarn needle for weaving in ends; several stitch markers (at least one for marking your rounds, but I used stitch markers to place my tentacles and found it very helpful) — I like to use the plastic kind that close like safety pins; scissors, and safety eyes/embroidery thread/anything you would like to use to decorate the face of your octopus. I used 10mm black safety eyes and a tiny bit of black crochet thread on the green, and safety eyes with no thread on the purple.
Terms and Abbreviations
MR – Magic Ring. If you aren’t sure how to make a magic ring, I would suggest searching for a video on youtube. It can take a bit of practice, but once you have it down it is a very useful tool for making amigurumi! If you have any trouble with this and need some pointers, please send me a message on instagram or here! I would be happy to make a quick video as well if you are more of a visual learner.
sc – single crochet
scBLO – single crochet in just the BACK LOOP of the stitch
hdc – half double crochet
sl st – slip stitch
ch – chain
sc2tog – single crochet two stitches together (insert hook, yarn over and pull up a loop, insert hook in next stitch, yarn over and pull up a loop, yarn over and pull through all loops on hook).
sc2togBLO – single crochet two stitches together in just the BACK LOOP of the stitch.
hdc2tog – half double crochet two stitches together (yarn over, insert hook, yarn over and pull up a loop, yarn over, insert hook in next stitch, yarn over and pull up a loop, yarn over and pull through all loops on hook).
SM – Stich Marker
Instructions
***This pattern is worked in continuous rounds. Do not slip stitch at the end of your round, simply go right into the next stitch. Place a stitch marker in the first stitch of the round so you can keep track, and move it up every time you start a new round. Begin with MR, chain 1 R1: 6sc in MR R2: 2sc in each sc (12) (Place SM in first stitch of round) R3: sc in first st, 2sc in next st. Repeat around (18) R4: sc in first two sts, 2sc in next st. Repeat around (24) R5: sc in first three sts, 2sc in next st. Repeat around (30) R6: sc in first four sts, 2sc in next st. Repeat around (36) R7: sc in first five sts, 2sc in next st. Repeat around (42) R8: sc in first six sts, 2sc in next st. Repeat around (48) R9-16: sc in each st around (48) R17: sc in first six sts, sc2tog. Repeat around (42) R18: sc in first five sts, sc2tog. Repeat around (36) R19: sc in first four sts, sc2tog. Repeat around (30) R20: sc in first three sts, sc2tog. Repeat around (24) R21: sc in first two sts, sc2tog. Repeat around (18) R22: sc in each st around (18)
At this point I would add the safety eyes or any other facial features you would like, add as much stuffing as you can, then continue.
R23: sc in each st around (18) R24: 2sc in each sc (36) R25: sc2togBLO, scBLO. Repeat around ALL IN BLO (24) R26: sc2tog around (12) Sl st to first stitch of round, chain one and fasten off, leaving a long enough tail to sew the hole shut. Add enough stuffing to fill the remaining space and sew shut. Weave in the end with yarn needle.
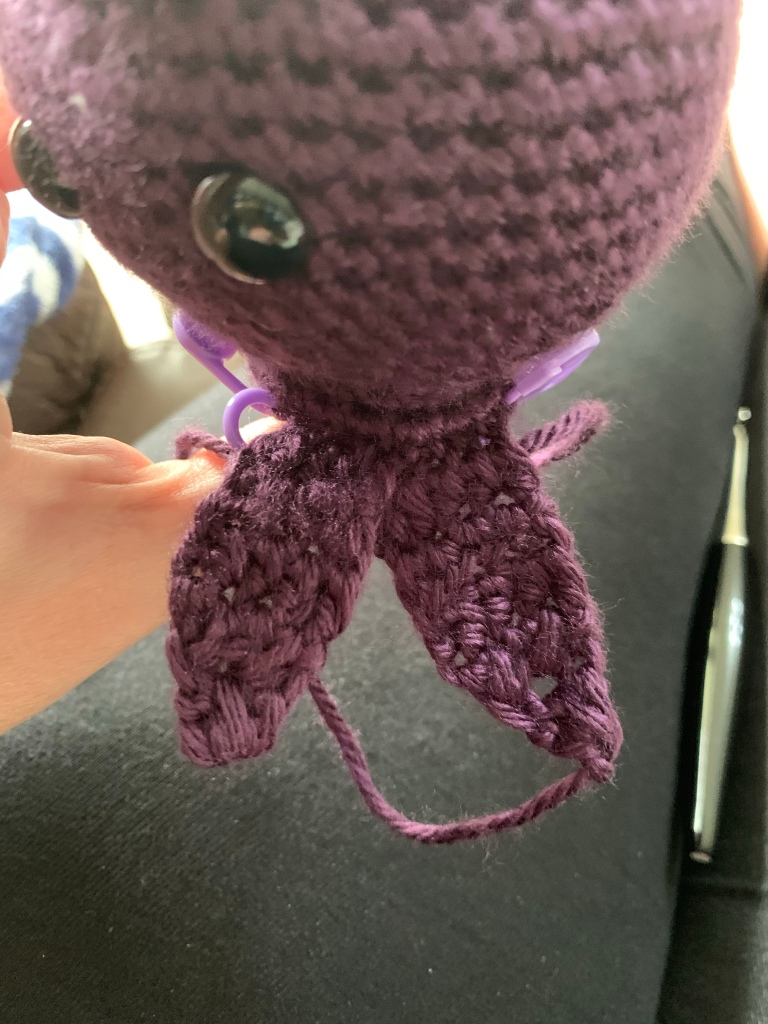
The tentacles will go in the FRONT loops of the row we did BLO. Use stitch markers to plan out where the tentacles will go. I placed the tentacles in groups of two, with one space in between each group. Each tentacle is 4 stitches wide: Space in front center, four stitches for tentacle 1, four stitches for tentacle 2, space, four stitches for tentacle 3, four stitches for tentacle 4, space, four stitches for tentacle 5, four stitches for tentacle 6, space, four stitches for tentacle 7, four stitches for tentacle 8 (total 36 including spaces)
I made each tentacle by attaching the yarn in the first stitch marked off for the tentacle, then R1-3: hdc in 4sts, ch1 and turn (4) R4: hdc2tog (x2), ch 1 and turn (2) R5: hdc2tog (1). Fasten off.
Repeat 8 times to finish off all the tentacles. Feel free to make the tentacles as long as you’d like!
That’s it!! I hope you have enjoyed this pattern. Please let me know if you decide to make this, and if you can, add a picture to your social media and tag it #zeustheoctopus and tag me in it as well @RiotousRootsHandmade
If you have any questions, please do not hesitate to contact me! I’m open to any and all feedback. Comments are welcome!
It has been a while since I posted anything. Life has been so busy with my two littles. Ruby is two and a half, extremely articulate, and wants to have conversations all day long. Paxton is 15 months and into everything. The days are long, but the years are short, and sometimes I just have to put down my phone or my hook and be with my babies.
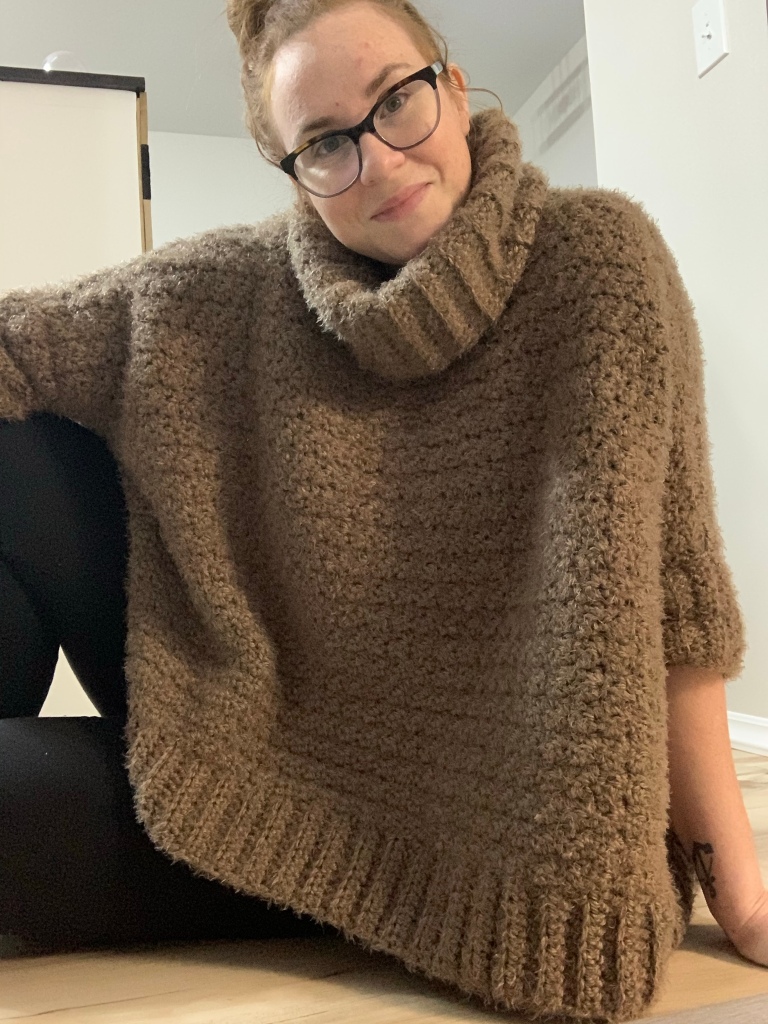
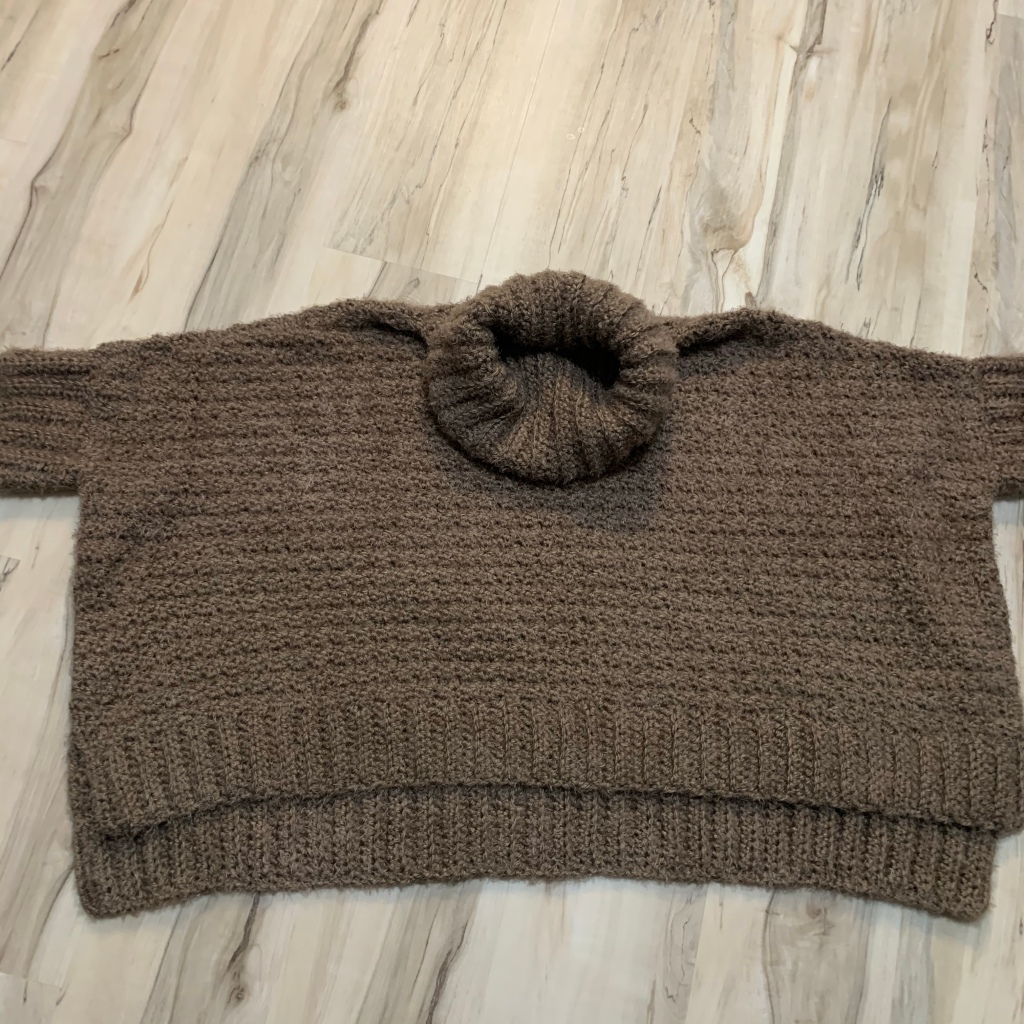
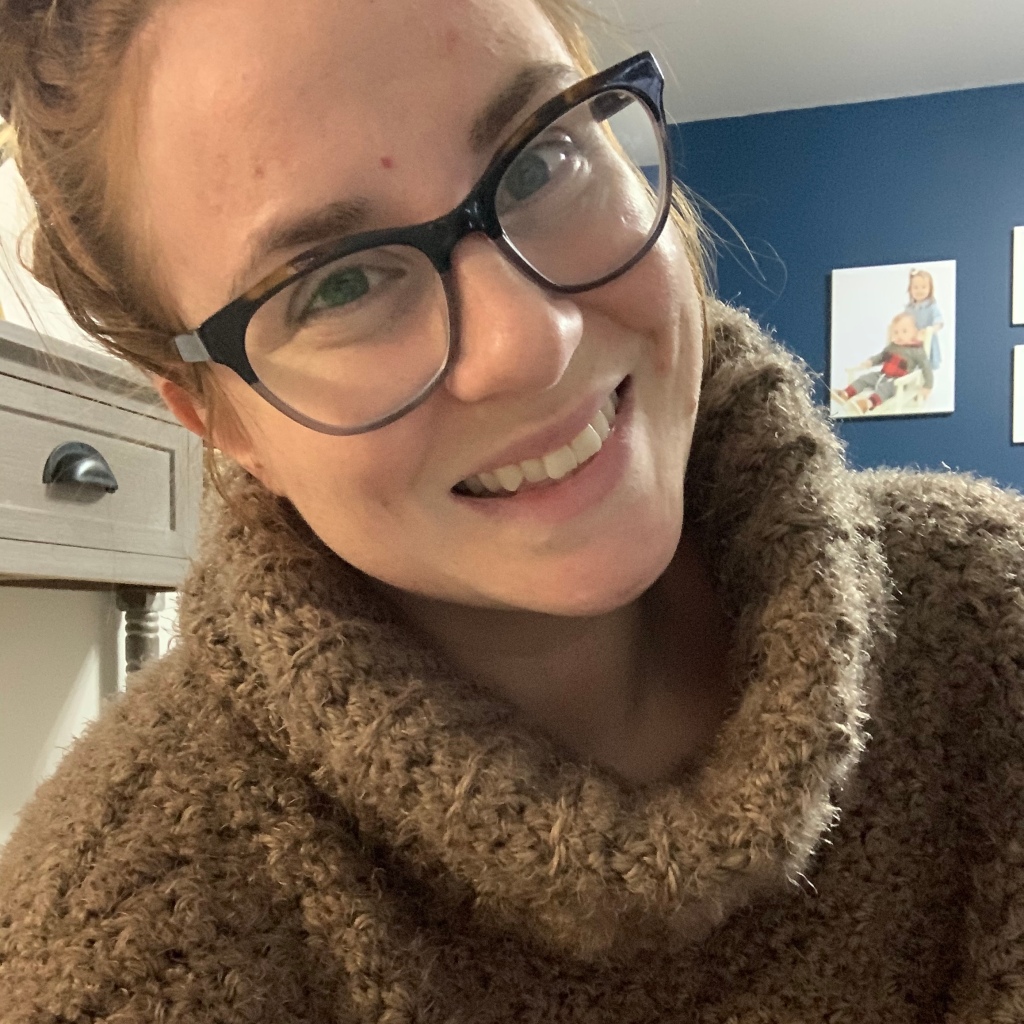
But here I am with a free tutorial! You will see why I’m not committed to calling this a “pattern” in just a bit. This is my most recent design, but the first sweater I feel confident enough to write up. Its pretty darn simple, and can be tweaked to whatever size or style you like! It’s also the coziest sweater I own now, and I may be living in it all winter. Thats why I’m calling it the Zuhause Sweater. The word zuhause is German for “at home.” And that is exactly how I feel in this boxy, oversized sweater.
The Design
It’s a bit modern in the fit — slightly cropped, extra wide, with a GIANT turtle/cowl neck and elbow-length sleeves. The fit of this was very deliberate and tailored to my own needs. But the pattern can easily be adjusted to fit yours!
To deviate away from the sweater itself for a moment, I’d like to very quickly explain a bit about my motives. I’m 37 years old. I had my kids later in life, and quite close together (they are 15 months apart). My body…did not “bounce back.” It does, however, bounce. Quite a bit actually. But it has been a real struggle for me to accept my new body. Also, postpartum depression hit me hard after the birth of my second child. I have spent a lot of time over the last two years on the couch, eating snacks. Breastfeeding — purported to make the baby weight melt right off of me — only made me CONSTANTLY FAMISHED. I could never eat enough to feed my hunger. So, here we are. Back-to-back pregnancies and c-sections and babies, breastfeeding and snacks and couch-sitting…my body has not bounced back.
I have not accepted my post-baby body.
I know that’s what I’m supposed to do. I’m supposed to embrace it and be proud of it and be grateful and in awe of all it has done. But instead, I have no clothes that fit, and the ones that do look terrible, and I hate going out in public. Plus, I’m always stained with something. Milk. Cracker crumbs. Mystery stuff.
Anyway, I’m getting way off topic. The point is, I wanted a sweater that was somewhat chic, I could wear out and about. But it also needed to be comfy and cozy, and hide things. Namely, my mom gut. I decided I needed something oversized. Like, REALLY oversized. But I needed it to fit in such a way that it draped around my belly area without being a total potato sack. This sweater very nearly became a poncho (and still can be, if that’s what works better for you), but in the end I decided to make it a sweater, with a cozy turtleneck (which basically became a cowl, because I drastically overturtled it), and I’m really happy with how it turned out. So happy, in fact, that I decided to type out the pattern right away, so that maybe someone else could make one to cozy up in this winter too.
The Yarn
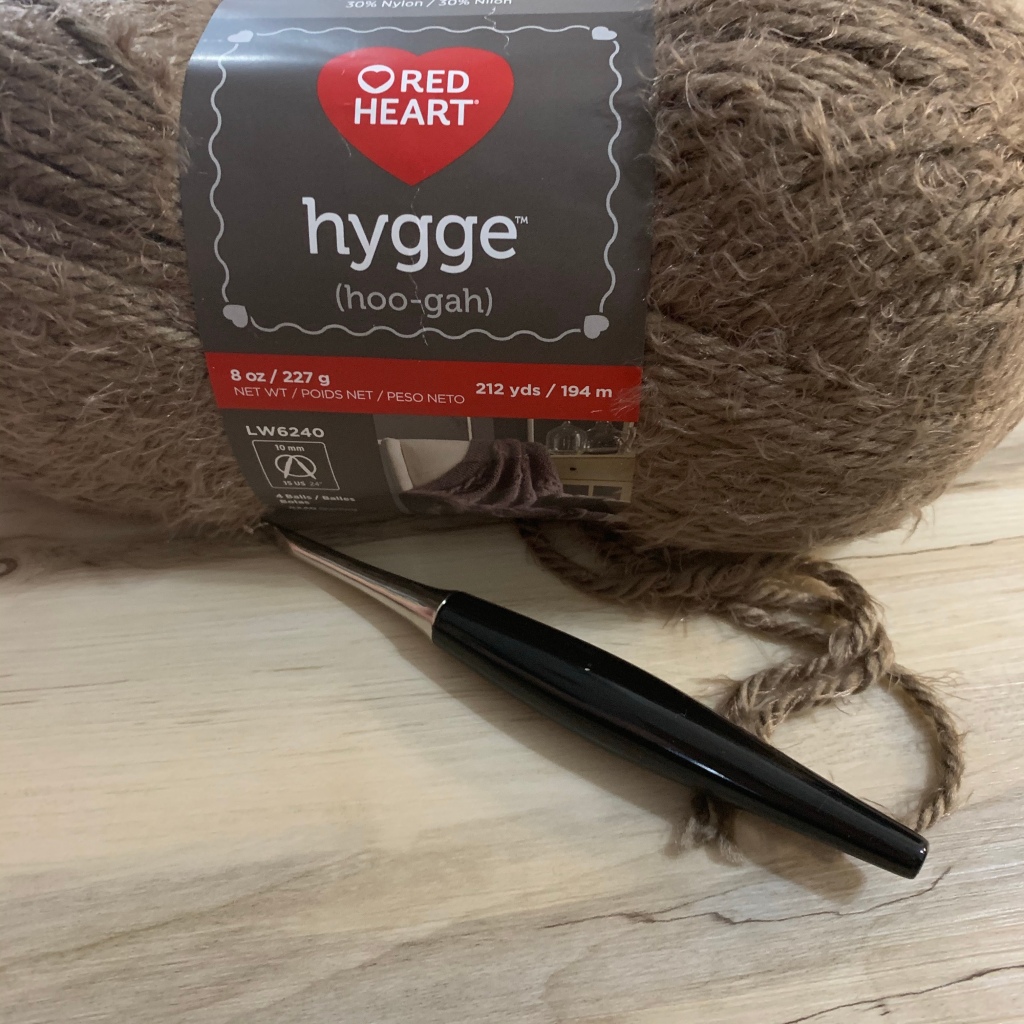
The first time I spotted Red Heart Hygge yarn in Jo-Ann stores, I could not stop touching it. It’s not quite like any other yarn I’ve worked with, and it’s so soft. The first thing I made with it was a beanie hat, and the second thing I made was a sweet fur-trimmed pixie bonnet. But I knew I needed to make a sweater out of it. It is a 5 weight chunky yarn, so I knew I had to be a bit strategic in how I used it. I didn’t want the sweater to be too heavy, in feel or in look, so I played around with stitches and hook size, and finally decided to just work it up and see how it turned out. Have I mentioned I’m living in this thing now?
The “Pattern”
For the sake of clarification, I’m calling this a tutorial instead of a pattern because it lacks some of the major points a true crochet pattern has. It has stitches and rows and all the instructions you will need to make this piece in my size. One of my BIG GOALS for 2020 is to learn how to write patterns for different sizes. Right now all I can do is make something that fits me. That’s not super helpful for other people who want to make my patterns, which is why I haven’t published any patterns yet. It’s a lot for me to wrap my head around, but I’m working at it. I have a lot to learn. So for now, anyone who wants to make a sweater for themselves out of this pattern will have to adjust the length and width to suit their own measurements and preferences. But if you have a little bit of experience making bottom-up, seamed sweaters, you should have no problem! Eventually down the line I hope to revamp this whole thing as a size-inclusive pattern. For now you have this.
With the exception of adjusting the measurements, the tutorial is pretty beginner-friendly, with some sewing that might make it a bit intermediate. Sizing is 100% adjustable to whatever you want it to be. You can make it longer or shorter, narrower, or wider (though it’s pretty darn wide as it is). The world is your oyster here. Please enjoy!
Difficulty: Intermediate
Yarn: Red Heart Hygge or a comparable bulky 5 yarn (Or really any yarn you like! This is fully customizable. But if you want soft, snuggly, and cozy, get the Hygge! I used 6 8oz skeins, approx. 1272yds.
Hook: Furls Odyssey M (8mm) or any 8mm hook
Gauge and Size/Fit: I did not swatch this for gauge. My opinion on this is that you can adjust the rows and stitches to be the length and width that you prefer. All directions in this pattern are for MY measurements. I am 5’6, 195lbs, with (roughly) a 41″ bust, 38″ waist, and 48″ hips. My finished sweater is about 36″ across, so there is about 15″ inches of positive ease (meaning the sweater is about 15″ wider than half of my chest circumference. So if you want a very wide boxy fit like mine, I would measure around your chest, divide by two, and add about 15″. The front of my sweater is shorter than the back, but again, you can adjust it to fit how you like.
You will also need: a yarn needle for weaving in ends; several stitch markers, (not required, but will make seaming a bit easier) — I like to use the plastic kind that close like safety pins; a tape measure; and scissors.
Terms and Abbreviations
sc – single crochet
dc – double crochet
hdc – half double crochet
sl st – slip stitch
ch – chain
rep – repeat
hdcBLO – half double crochet in the back loop only (insert hook into the back loop of the stitch, rather than both loops).
SM – Stich Marker
ScDcTog – This is an optional stitch when forming the neckline, as you will see in the instructions below. Begin sc, but before final pull through, yarn over and go into the next stitch. Yarn over, pull through two loops, yarn over, pull through all three loops on the hook, completing a dc).
DcScTog – This is an optional stitch when forming the neckline, as you will see in the instructions below. Begin dc, but before the final pull through, go into the next st. Yarn over and pull through all three loops on the hook, completing a sc).
Instructions
Back Band: R1: Chain 11, hdc in second chain from hook and in each chain across. Ch 1 & turn. (10) R2-69: HdcBLO in each stitch across, ch 1 & turn (10). This band determines the width of your sweater. You may want to add or reduce the rows of the band to suit your measurements and preferences.
Body: You should now have a long narrow band of ribbing. After you have finished your last stitch of hdcBLO, ch 1 and turn your work 90 degrees. You will now be working across the long edge of your band. R1: sc in first stitch, dc in the next stitch. Repeat (sc, dc) across entire row for 92 stitches. Ch 1 at the end of the row and turn. The number of stitches will be different if you changed the number of rows of ribbing. 92 stitches is roughly four stitches for each 3 rows of ribbing. (92) R2-44: (sc, dc) across the row. Ch 1 and turn. (92) Each sc will be into a dc of the previous row, each dc will be stitched into a sc of theprevious row. There are several different names for this stitch pattern, but I learned it as griddle stitch, and it’s one of my favorites! At the end of row 44, turn your workwithout chaining. R45: Do not chain. Sl st into the first 4 stitches, then Ch1. (sc, dc) 84 stitches (until 4 stitches remain), leave last 4 stitches unworked. Turn without chaining. Place a SM in 1st sc worked. (88) R46: sl st 4, ch 1. (Sc, dc) 76 st. Turn without chaining. Place SMs in 1st sl st and 1st sc worked (80) R47: sl st 4, ch 1. (sc, dc) 68 st. Turn without chaining. Place SMs in 1st sl st and 1st sc worked (72) R48: sl st 4, ch 1. (sc, dc) 60 st. Turn without chaining. Place SMs in 1st sl st and 1st sc worked (64) R49: sl st 4, ch 1. (sc, dc) 52 st. Turn without chaining. Place SMs in 1st sl st and 1st sc worked (56) R50: sl st 4, ch 1. (sc, dc) 44 st. Turn without chaining. Place SMs in 1st sl st and 1st sc worked (48) R51: sl st 4, ch 1. (sc, dc) 36 st. Turn without chaining. Place SMs in 1st sl st and 1st sc worked (40) R52: sl st 4, ch 1. (sc, dc) 28 st. Turn without chaining. Place SMs in 1st sl st and 1st sc worked (32)
Front: Make a band identical to the band you made for the back (69 rows of 10hdc ribbing). Turn your work 90 degrees and continue along the long edge of the band for the body.
Body: R1: (sc, dc) across, make 92 stitches. Ch 1 & turn. (92) R2-36: (sc, dc) across. Ch 1 & turn. (92) (do not chain before turning at the end of R36) R37: sl st 4, ch 1. (sc, dc) 82 st. Turn without chaining. Place SM in 1st sc worked (88) R38: sl st 4, ch 1. (sc, dc) 76 st. Turn without chaining. Place SMs in 1st sl st and 1st sc worked (80) R39: sl st 4, ch 1. (sc, dc) 68 st. Turn without chaining. Place SMs in 1st sl st and 1st sc worked (72) R40: sl st 4, ch 1. (sc, dc) 60 st. Turn without chaining. Place SMs in 1st sl st and 1st sc worked (64) Here we will begin to make a neckline. This part is optional. You can continue to decrease each row by 4 stitches on each end for 4 more rows, or you can continue on here. For these last four rows my instructions will split each row into two sides. R41: sl st 4, ch 1. (sc, dc) 16. ScDcTog. Ch 1 & turn. Place SMs in 1st sl st and 1st sc worked (21) R42: DcScTog. Dc in next st. (sc, dc) 10. Turn without chaining (12). R43: sl st 4, ch 1. (sc, dc) 6. ScDcTog, ch 1 & turn. Place SMs in 1st sl st and 1st sc worked (11) R44: Sc in all 3 stitches. (3) Fasten off.
Opposite Side (attach yarn in 38th stitch from opposite end): 41: ScDcTog. (sc, dc) 16 st. Turn without chaining (17) 42: sl st 4, ch 1. (Sc, dc) 10. Sc 1. DcScTog. Ch 1 & turn. Place SMs in 1st sl st and 1st sc worked (16) 43: ScDcTog. (sc, dc) 6. Turn without chaining. (7) 44: sl st 4, ch 1. Sc in next 3 st. (7) Fasten off.
You should now have two pieces with sloping shoulders, one longer than the other. The shorter piece should have a dip for the neck hole. Line up the tops of these two pieces, matching up the stitch markers, and seam across the top using your method of choice, leaving the neck hole open. For this part I used a whip stitch, but I think if I were to do it again I would use a mattress stitch. Once you have seamed across the top, seam down the sides, leaving an opening for the arms. I began my seam about 12-13 rows down from the shoulder, and seamed down to the top of the ribbed band on the front piece, leaving the sides open where the bands are.
Sleeves: Ch 13 R1: hdc in 2nd ch and in each ch across. Ch 1 & turn. (12) R2-24: hdcBLO in each st across. Ch 1 & turn. (12). Fasten off after row 24 and seam R1 to R24 using your seaming method of choice (I prefer a mattress stitch) to form a sleeve cuff. Attach each cuff to the sleeve openings.
Neck: Ch 36 (You may want to reduce the amount of stitches here. I made mine very tall and have to fold the neck twice when I wear it. If I were to make this again I would probablygo quite a bit shorter on the neck, maybe 25 stitches or even less. You could also decide not to do a turtleneck/cowl at all and just do a few stitches of ribbing around the neckline to polish it off. Make it your own!) R1: idc in 2nd ch from hook and in each ch across. Ch 1 & turn (35) R2-44: hdcBLO in each st across. Ch 1 & turn (35). Fasten off after row 44 and seam R1 to R44 using your seaming method of choice (I prefer a mattress stitch) to form the neck. Attach the neck to the neck opening.
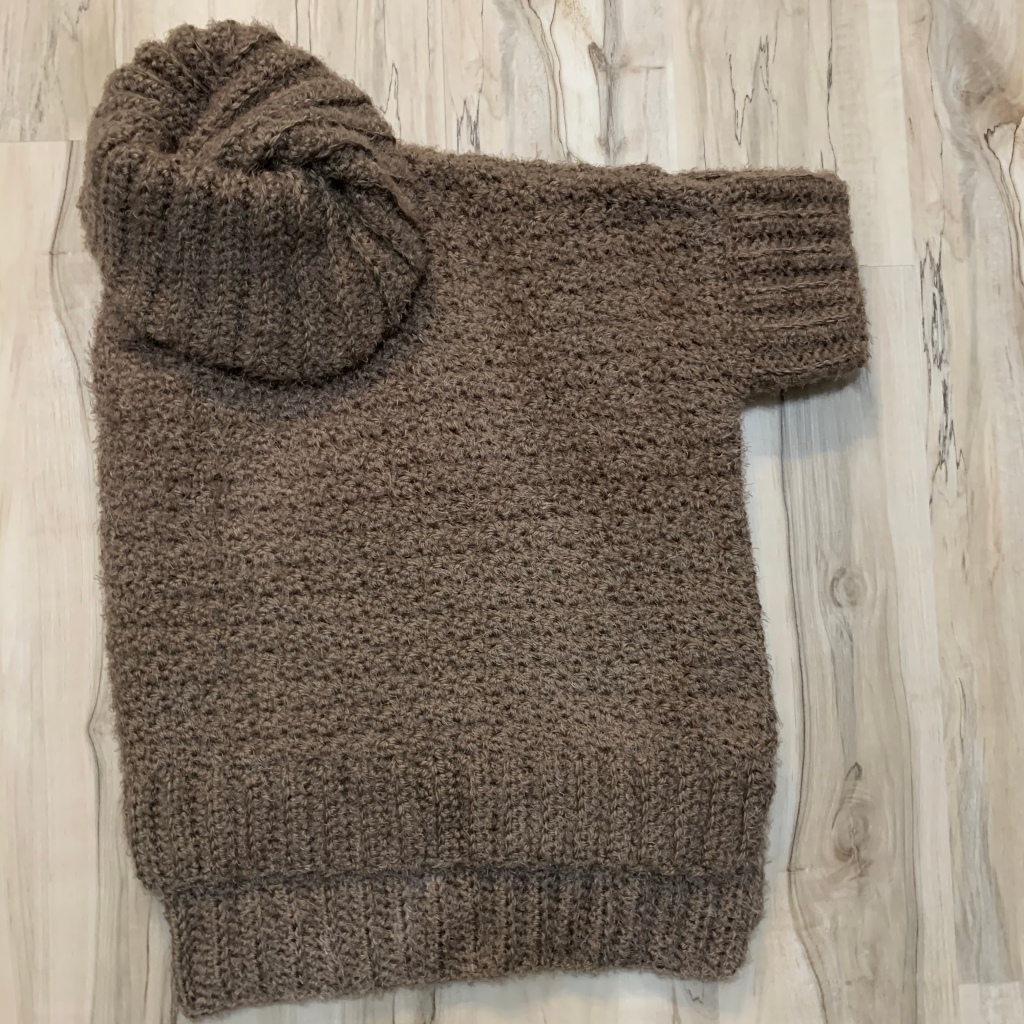
It’s wiiiiiide.
YOU’RE DONE!
Pleas please PLEASE take a picture of yourself wearing your new comfy boxy Zuhause Sweater and share it on Instagram! Tag me @riotousrootshandmade and use #zuhausesweater on social media! I would LOVE to see a few people make this for themselves.
Also, if you really want to help me out as I continue on this journey learning to write patterns and use sizing, send me a DM or email (riotousrootsco@gmail.com) how many stitches per row and how many rows you ended up using to customize your Zuhause Sweater.
If you made it this far, I can’t thank you enough. Nothing would make me happier than for someone to make this pattern for themselves and show it off for me. Happy hooking!!
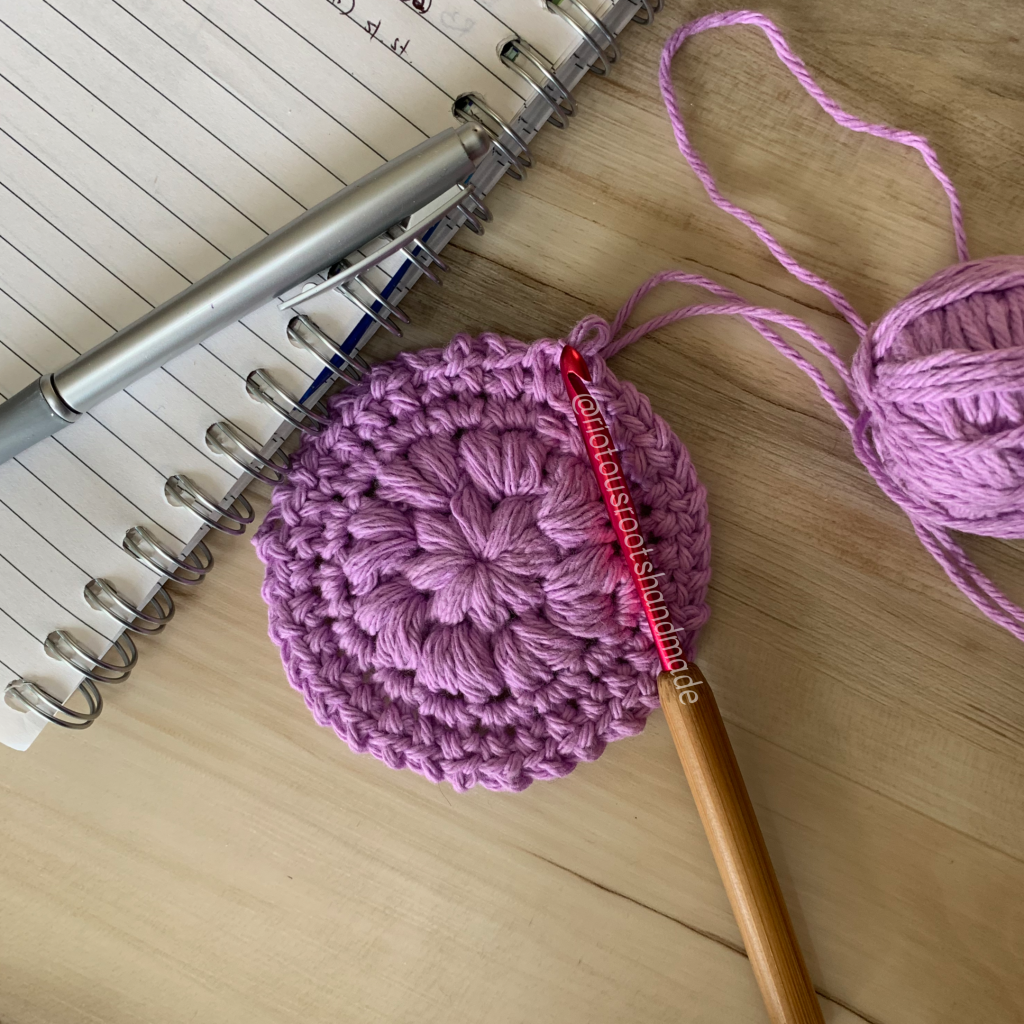
I’ve decided that the first pattern I’m going to share on this blog is actually the most recent one I’ve written. It’s also the simplest, and it’s also actually three patterns. I had tried a few different scrubby patterns I found online, and while they were all fine, did the job, etc., I didn’t love any of them. So I decided to make my own.
Once I made one, I decided to tweak it a bit to make a second one, then couldn’t decide which one I liked best. Finally I decided to keep them both, and then whipped up a super simple and classic flower shape to round off my trio.
I give you: Aster, Dahlia, and Poppy
A Bouquet of Scrubbies
About the Yarn
For these patterns I used worsted weight (4) 100% cotton yarn. These were all mill end yarns that didn’t have a brand or company labeled on them, so your guess is as good as mine, but any cotton yarn will do. I think some of these are even DK weight (3), because they came out smaller than the rest, but again, for this project, either will do. Likewise, gauge is not important for this project.
The Patterns
Difficulty: Easy
Yarn: Any worsted (4) 100% cotton yarn. I prefer Lily Sugar’n’Cream, but really any will do.
Hook: US H8/5mm hook. For this project I used a Susan Bates hook.
Gauge: unimportant
You will also need a Yarn Needle for weaving in ends, and a stitch marker is optional for keeping track of rounds. I like the plastic kind that close like little safety pins.
Terms and Abbreviations
MR – Magic Ring. There are LOTS of tutorials on YouTube for how to make a magic ring. I hope to make a tutorial for it also (stay tuned)!
sc – Single Crochet
dc – double crochet
tc – treble (triple) crochet
sl st – slip stitch
ch – chain
Rep – repeat
Ch sp – chain space; the space made by a chain 1 from the previous round.
SmPuff – (special stitch) Small Puff stitch. See below for instructions on how to make this stitch.
Small Puff Stitch
Puff stitches can be just about any size you wish. For this project, I kept it simple. Yarn over, pull up a loop (3 loops on hook), yarn over and pull up another loop (5 loops on hook), yarn over a third time and pull up a loop (7 loops on hook). Yarn over and pull through all 7 loops on hook. This completes your small puff.
Notes: (1) This pattern is written in American Standard Terms. (2) CH1s at the beginning of rounds do not count as a stitch in the final stitch count. (3) Yarn and hook size are only meant as a guide. If you are a looser crocheter you may want to go down a hook size.
Instructions
Aster
Begin with a Magic Ring, ch. 1
Round 1: *small puff st., ch 1* repeat * * 7 more times. Join to 1st puff stitch with a sl st. (8 puffs, 8 chains)
Round 2: sl st to 1st ch sp, ch 1. Work 2 small puffs into each ch sp around (please note that we are not chaining 1 after each puff in this round). Join to 1st puff with sl st. (16 puffs)
Round 3: sl st to next stitch, ch 1. Work 2 Sc into same st you just sl st into. Work 2 Sc into each st around. Sl st into 1st Sc of round to join. (32 Sc)
Round 4: ch 1. *sc, ch 1* Repeat * * in each st around. Join with sl st to 1st Sc of round. (64 sts)
You can either fasten off here, or continue on to add a loop to hang your scrubby on a hook.
Hook Loop: Ch 10. Sl st to same st that you joined the final round in. Fasten off and use yarn needle to weave in ends.
Aster
Dahlia
Begin with a Magic Ring, ch. 1
Round 1: Work 8 sc into MR, join with sl st to 1st sc (8sc)
Round 2: Ch 1, work small puff st in 1st Sc, ch 1. *sm puff, ch 1*, rep * * in each sc. Join with sl st to 1st puff st. (8 puffs)
Round 3: Sl st to 1st ch sp, ch 1. Work 2 small puffs in 1st ch sp. (do not chain between puffs). Work 2 small puffs in each ch space around. Join with a sl st to 1st puff. (16 puffs)
Round 4: sl st to next st. Ch 1. 2sc in each st around. Join with a sl st to first sc of round. (32 sc)
Round 5: ch 1. *sc, ch 1* in each st around. Join with sl st to first sc of round. (64sts)
You can either fasten off here, or continue on to add a loop to hang your scrubby on a hook.
Hook Loop: Ch 10. Sl st to same st that you joined the final round in. Fasten off and use yarn needle to weave in ends.
Dahlia
Poppy
Begin with a Magic Ring, ch. 1
Round 1: Work 12sc into MR. Join with sl st to first sc (12sts)
Round 2: ch 3, dc in same st. 2dc in each sc around. Join with a sl st to the third chain in your turning chain. (24dc)
Round 3: ch 1. (*sc, dc* in same st. Tc in next st. *dc, sc* in next st). Rep ( ) 7 more times. Join with a sl st to first sc. (30sts)
You can either fasten off here, or continue on to add a loop to hang your scrubby on a hook.
Hook Loop: Ch 10. Sl st to same st that you joined the final round in. Fasten off and use yarn needle to weave in ends.
Poppy
That’s it! If you’ve made it this far, thank you for reading (and hopefully making!) my VERY FIRST pattern! If you do make them, please SHARE your makes on Instagram using the tag #bouquetoffacescrubbies and TAG ME @riotousrootshandmade. Also please follow me to keep up to date on new blog posts and get sneak peeks of all of my makes and patterns. Welcome to my journey as a real life crochet designer. ❤️
Once I got the hang of crochet and tried lots of different kinds of patterns and learned lots of new stitches and construction methods, I knew that I wanted to design. I wanted to create something new, made just for me, by me, from my own mind. Of course I got lots of inspiration from other designers, from things I saw in everyday life or on television, or I would learn a new stitch and think, “Okay, I have to make something using this stitch!”
It was harder than you might think to take the plunge into designing my own patterns. I’ve always been the type to hold back from throwing myself into anything, for fear of failure. What if I did a bad job? What if the pattern didn’t work out? What if it looked TERRIBLE?
And then one day I was frogging an ENTIRE project (from someone else’s written pattern) because I didn’t size it properly, and it hit me. Frogging isn’t the worst thing ever. Yarn arts can be SO forgiving. You can’t uncut fabrics if you mess up a sewing project. I imagine pulling out all of the threads of a cross stitch would be hell on earth. But in crochet (and knit too, I would imagine, though I am not a knitter myself — yet), you can frog your project back to a pile of yarn barf and start all over again without wasting anything but time. And each time you mess up, you learn something.
So, I started crocheting. Not from a pattern, just from what I saw in my mind. I wanted a particular piece that used a particular stitch, and I couldn’t find a pattern that was quite what I wanted. So I made one myself. It wasn’t perfect, and I will probably revisit it at some point and make another, more refined version, but it was something I could really be proud of. I made this. I thought it up, and I created it from my brain!
Since that first one I’ve designed a couple of patterns, and I plan to keep creating more and more. To design crochet patterns is kind of my dream. And I’m kind of doing it. I might be the only person on the planet to ever actually use these patterns, but that just means the pieces I create will be one-of-a-kind.
Crocheting brings me so much joy, and designing brings me such a sense of freedom. I cannot wait to share my patterns with the world!
This morning I learned that it’s International Crochet Day, so I decided I need to stop dragging my feet and make a blog! I know very little about blogs (except that I like to read them), and there seem to be far too many layout options, but I’ll figure that all out as I go.
Crochet is something I’ve dabbled in off and on for many years, but never something I stuck with until about three years ago. I was pregnant with my first child, and I wanted to make some cute photo props. It was my first time reading patterns, and I knew nothing about yarn weight, hook size, or gauge. My attempts LOOKED ok, but the sizing was totally off and of course there were plenty of mistakes. But I learned. So the next thing I made looked a little better.
The very first thing I crocheted for my baby girl…obviously gauge is a thing I knew nothing about at the time.This was the first pattern I made from a YouTube tutorial, by YARNutopia by Nadia. Her tutorials are SO beginner friendly, I highly recommend!
As I searched the internet for patterns, I expanded my arsenal of tools. I learned that different size hooks make a BIG difference in what your work looks like. I learned about stitch markers and needles to weave in ends. I learned how to crochet in the round, how to change colors, how to decrease and increase my rows. Suddenly, piece by piece, the world of crochet opened up and it wasn’t overwhelming at all anymore. Before I knew it I was making things I had dreamed up in my own head.
So today, finally, I’m starting a blog. My patterns will be shared here, maybe tutorials for beginners, maybe yarn reviews and comparisons…I’m not even sure yet what I want to put here. But I’m doing this!