Pumpkin Seeds – Yummy & Nutritious

pumpkin seeds

Carving pumpkins is one of my favourite things to do with the kids during the Autumn season. Going to the pumpkin farm, watching the kids pick the most special pumpkin in the world, and then carving them! But what do you do with all the pumpkin “guts”? Sure, you can compost it OR you can roast themmmmmmmmm.

Pumpkin seeds are filled with some serious goodness no matter which way you eat them. They are the only seed that is alkaline-forming which is probably a life saver in this world of high acidic diets.

Nutritional Facts & Health Benefits of Pumpkin Seeds:

  • Are filled with lots of minerals including phosphorus, magnesium, manganese, iron and copper.
  • Are a good source of vitamin K.
  • Contain phytosterols, compounds that that have been shown to reduce levels of LDL cholesterol.
  • Contain L-tryptophan, which helps with good sleep and lowering depression. Tryptophan is converted into serotonin and niacin. Serotonin is also very helpful in helping us to have a good night’s sleep.
  • Are high in zinc, making them a natural protector against osteoporosis. Low intake of zinc is linked to higher rates of osteoporosis. In a study of almost 400 men (age from 45-92) published in the American Journal of Clinical Nutrition they found a correlation between low dietary intake of zinc, low blood levels of the trace mineral and osteoporosis at the hip and spine.
  • Are a good source vitamin E; they contain about 35.10 mg of tocopherol per 100 g.
  • Are the most alkaline-forming seed.
  • Are an excellent source of vitamin B group (thiamin, riboflavin, niacin, pantothenic acid, vitamin B-6 (pyridoxine) and folates).
  • Contain good quality protein. 100 g seeds provide 30 g.
  • According to studies, pumpkin seeds prevent calcium oxalate kidney stone formation.
  • Reduce inflammation for arthritis without the side effects of anti-inflammatory drugs.
  • Are used in many cultures as a natural treatment for tapeworms and other parasites.
  • Are good for prostate health! The oil in pumpkin seeds alleviates difficult urination that happens with an enlarged prostate.
  • Eat with the shell, the shell is high in fibre.

So how to roast those bad boys? Here is a simple recipe to do so:

What you need:

  • Pumpkin Seeds (well, duh)
  • sea salt
  • pepper (freshly cracked from a pepper mill is great)
  • olive oil
  • baking sheet

What you do:

  • preheat your oven to 325 degrees
  • place all pumpkin seeds in a strainer or colander and rinse very well with water until all the orange goop is gone, let drain
  • drizzle olive oil onto your baking sheet
  • evenly spread pumpkin seeds onto the baking sheet
  • sprinkle as much sea salt and pepper as desired, drizzle some more olive oil over the pumpkin seeds
  • pop in the oven and let roast until they are golden in colour, usually around 25-30 minutes
  • *** Note: stir the seeds half way through roasting time.

And there ya have it, a super yummy, super nutritious, super addictive snack!

Enjoy!

Teflon – NOT As Great As You Think

noteflonwm

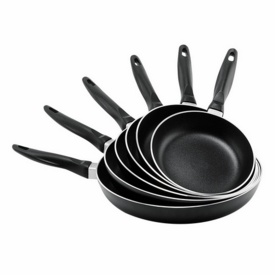
Teflon…a great discovery for kitchenware to help keep your yummy goodies from sticking to the pans. BUT how great of a discovery was it to add this to the items we cook the food we consume? Not so great! Dangerous even.

Did you know this fact about the coating on your precious frying pan; it has been known that when Teflon is heated to very high temperatures, that it can release a compound that kills birds and causes flu-like symptoms in humans. These symptoms in us humans go away so we don’t even know it! Scary huh?

Not only is in your cookware, it is also in fabrics to repel sweat, fabric protectors like Scotchguard, and has even been said to be added to the inside of the bag of microwave popcorn. The list does goes on, but these are just a few things we use every day that we are exposed to Teflon daily.

Think about this for second, GE has been using teflon coating in their lightbulbs to be promoted as “shatter proof”. Except when these lightbulbs are heated up, it produces a gas that kills chickens! Do you want that in your home? I didn’t think so.

teflon-frying-pan

So how do you protect yourself and your family? Step by step, and by researching. Everyone knows how to Google! But you can start by taking the Teflon coated items out of your home and switching them with glass, stainless steel, and even better, good ol’ fashioned cast iron cookware.

*Side fact: When you cook with cast iron, iron does get absorbed into your food and you will benefit with from the extra iron 🙂 Neat eh?

teflonpans

So now that you know that Teflon is not as great as you think, what are you going to do about it?


Homemade Liquid Laundry Soap

ls2

Here is a very economical way to save your pennies, clean your clothes and help the environment! Not too mention the great feeling of using something you have made yourself that is all natural!

Some things to remember:

This soap is pretty concentrated so you will only need about 1/2 cup to 1 cup per load. With that being said, even though it’s packed with dirt scrubbing goodness, it WILL be pretty watery, not thick like store-bought soap. That’s ok! It just doesn’t have the additives in it to foam up and get bubbly like store-bought.

What you need:

  • 1 cup Washing Soda (see my previous post on how to make it yourself if you can’t find anywhere to buy it)
  • 1 cup Borax (I bought mine at Walmart in the laundry soap section, at the very bottom, looking very lonely, almost forgotten)
  • 1 cup Castile Soap (I used Dr. Bronners in Unscented/Baby so I can add my own scent)
  • 10 drops of Orange Essential Oil, or whichever scent you prefer. (Make sure you use 100% essential oil, others made that are not 100% can be very harsh for your skin)
  • 4 cups Boiling Water
  • Cold Water to add at the end
  • an empty laundry soap jug around 1 gallon. (don’t make the mistake I made and put it into an old juice container. Once the boiling water hit it, it bloated up)

ls1

What you do:

  • start by boiling your water, stove top or kettle is just fine
  • in a mixing bowl, whisk the borax and washing soda together, add to the jug
  • add your castile soap
  • add your 10 drops of essential oil
  • add your boiling water
  • place lid on tight and give a good shake
  • remove lid, add cold water until the jug is full. (don’t fill too fast as your soap will start to foam)
  • replace lid and give another good shik-a-ty shake and use!

That’s it! Now give it a test run. I use mine in my HE machine so it will most definitely be safe for yours as well 🙂

If you find your dry ingredients settle to the bottom, just do another dance and shake it up!

Super Easy DIY Washing Soda

washingsodawm

Most (but not all) homemade laundry soap includes Washing Soda as a main ingredient. I could not find this stuff anywhere in my small town and I sure wasn’t going to order it online….and pay shipping….and have to wait…..that’s just not how I roll.

SO! After extensive (not so much) research, I learned that washing soda can be made from baking soda! This is how, and where I go all smart and nerdy on ya!

Baking Soda is Sodium Bicarbonate

Washing Soda is Sodium Carbonate + Carbon Dioxide + H20

When baking soda is heated up at a very high temperature, it becomes Washing Soda! Pretty neat huh?

I found a lot of blog posts and websites that had different ways to “bake” the washing soda, but I found an easy  method:

What you need:

  • Baking Soda….yup! That’s it!

bs

What you do:

  • Preheat your oven to 400 F (approx 205 C)
  • Spread your baking soda evenly into a cookie sheet or glass pan
  • Bake for 30 minutes, stirring around with a fork every 10 minutes or so.
  • Remove from over, let cool, and store in a jar.

tray

Now you are probably wondering “How do you know if the baking soda has turned into washing soda?”

It’s tricky at first, but you will soon see the difference once you get the hang of it.

They will both look pretty similar, both white but Baking Soda can clump where Washing Soda becomes very fine and will not clump.

You can sort of see the difference here below, left is Baking Soda and right is Washing Soda.

difference

So this whole method is pretty easy to do, and definitely saves you money because seriously, who doesn’t have an open box of baking soda in their cupboard?

Now you are ready to add your homemade Washing Soda to your homemade laundry soap 🙂

Sweet & Salty Slow Cooker Ham and Apple Sauce

ham1

How would you like to come home to the sweet smell of cinnamon filling your house? Mmmm hmmmm me too!!

Prep time: 15 minutes

Cooking time: 4-5 hours

What you need:

  • half-cooked or fully-cooked ham, boneless or bone-in doesn’t matter (I used Schneiders Olde Fashioned fully-cooked)
  • 3 granny smith apples, peeled and cut into eighths (this fed my family of 5, you can add more apples if you like)
  • brown sugar
  • cinnamon
  • 1/3 cup of water (for apple sauce)
  • butter or margarine to grease bottom of cooker


What you do:


  • grease bottom of your slow cooker with butter or margarine
  • spread a thin layer of brown sugar at the bottom of the cooker
  • place ham, flat side down, on top of brown sugar
  • peel, cut, and spread your apples around the ham
  • sprinkle as much or as little of cinnamon on top of everything
  • cook on LOW for 4-5 hour or until your ham reaches the internal temp of 150F

Apple Sauce:

  • remove your apple slices and put them into a small saucepan
  • put temp to med-high until you hear them sizzle a bit
  • quickly add your 1/3 cup of water and start mashing away (I use a potato masher)
  • when your apples have absorbed enough water and it starts to thicken up, turn heat down to medium.
  • keep mashing until the consistency suits your taste.

No need to add anything to your apple sauce because they will be sweet enough.  Your sauce will have a nice rich brown colour thanks to the brown sugar 🙂

Slice up your ham, add the apple sauce and serve! Enjoy!


ham1


Gluten – Free Shortbread

wm1 2

One of the Christmas Holidays most favourite baked treat, but not just for Christmas! I made these ones in the shape of a pumpkin in celebration of the first day of Autumn. These Shortbread are not only yummy, crumbly, just-like-Mom-used-to-make, but even better they are GLUTEN-FREE!

What you need:

  • 2 cups rice flour, gluten-free
  • 2 tsp xanthan gum, gluten-free
  • 1 cup of unsalted butter (half of a 454g stick of butter)
  • 1/2 cup sugar
  • 1 tsp vanilla

ingredients2

What you do:

  • preheat oven to 350F (180C)
  • whisk together rice flour and xanthan gum in a small bowl
  • in large bowl, cream together butter and sugar until light and fluffy using a spatula or wooden spoon.
  • mix in vanilla
  • stir in flour mixture and knead lightly until dough is smooth
  • roll on a lightly floured surface to 1/4″ thickness (6mm)
  • cut with cookie cutter
  • place on ungreased baking sheet and refrigerate for 20 minutes
  • bake at 350F for 14-17 minutes or until slightly golden around edges
  • let cool 10 minutes on baking sheet before removing.

cutter2

Makes approx. 20-30 cookies, depending on how big your cookie cutter is.

Enjoy with a warm cup of tea (or coffee or hot chocolate mmmmmmmm)

Chicken Noodle Soup STEW?

Is it soup? Is it stew? It’s BOTH! It’s hearty, and delicious and oh sooo oooooohhh well you just need to make it and you will endulge in a traditional favourite that will keep every tummy in your family nice and warm.

This recipe is an OOPS! It was meant to be just Chicken Noodle Soup but ended up turning into more of a stew and I don’t regret a thing (and neither does my husband).

stew2wm

What You need:

  • 12 cups of chicken broth
  • 2 large carrots, sliced
  • 3 ribs of celery, sliced
  • 1/2 med-large spanish onion, chopped (I kept my slices big so my nit-pickers can pick them out)
  • 1 clove of garlic, minced (I used purple garlic because it was not so overwhelming as white garlic)
  • 2 bay leaves
  • 1/2 tsp thyme
  • 4 tsp salt
  • 1/2 tsp pepper
  • egg noodles, as many as you like (I used 3/4 bag of “No Yolk”)
  • 4-5 frozen (or fresh) boneless, skinless chicken breasts

stew1

What You do:

  • In a large crock pot, add all ingredients, except chicken and noodles, and stir together
  • place whole chicken breasts on top of mixture
  • cook on low for 8 hours (up to 10 hours if you know your pot won’t cook the chicken in that amount of time)
  • remove chicken and bay leaves.
  • discard bay leaves
  • pull apart chicken (it will be so tender enough)
  • add noodles and chicken to pot for another 20 minutes.

stew3

serve and enjoy!

Your house will also smell absolutely amazing for the whole day!!!

Organize Your School Snacks

It’s that time of year again…shops are emptier, streets are quieter….yup! BACK TO SCHOOL!!!!

As much as I look forward to back to school as the next Mom, one thing I always dread is the making of the lunches time. I started a few years ago to make them at night time so I can have  a little extra time in the morning. But at the end of the day, I’m just so tired to think about chopping the veggies and all the prep that goes with it. UGH! I get an hour to myself at night and really, I just want to sit and veg myself.

veggies

So I’m scrolling through Facebook a week or so ago, I saw on a friend’s timeline something absolutely BRILLIANT!!! But so simple…..but brilliant! Preparing your snacks for the week ahead. See? Brilliant! Thank you so much Mrs. Funnell (you know who you are 😉 )


This idea was so appealing to me because now that the kids are getting older, they are always asking to make their own lunches (yup, they offered! I didn’t have to ask). But I wasn’t going to let them chop their veggies them self (obviously) so this is super beneficial to all of us. Now they can just go to their baskets in the fridge and grab their snacks!

What you need:

  • Basket or plastic tote (that will fit in your fridge) for each child. (I got mine from the dollar store)
  • your snacks
  • room in your fridge

What you do:

  • Just prepare your snacks as you would every day, but enough for the week.
  • seperate your snacks into the baskets
  • and you’re done!

veggiedrawer

I would love to hear some feedback about how you organize your school snacks!

Rainy Day S’mores

T’was the night before the night before the 1st day back to school. I had planned for a few days to do something fun with the kids. We live out in cottage country so bonfires are second nature for us. Of course with sitting around the fire comes S’MORES!

Guess what?!! It rained 😦 BUT we weren’t going to let that dampen our spirits. We still made S’mores, just inside…Toaster oven style. They were yummy, melty, and oh-so-gooey. Almost as good as campfire S’mores……….almost 😉

Here’s how it all went down. And if you have never made S’mores in your life (or live under a rock and have never heard of them) then this will show you exactly how to make one of the best treats in the world 😀

smores2wm

What you will need:

  • Graham crackers
  • Marshmallows (we used the giant campfire marshmallows and cut them in half. 1 half per s’more. They won’t roll around on you either)
  • Bar of HERSHEY’S milk chocolate
  • Tin Foil (Aluminum Foil)
  • Tongs
  • Toaster Oven

Prep:

  • Tear off as many sheets of foil as how many s’mores you will be making
  • Most packs of graham crackers come in the long rectangle form for you to snap into two. You will need 2 halves per s’more.

What you do:

  1. With a sheet of foil in front of you, place one half of graham cracker on it with the flat side facing up.
  2. Place 3 pieces of the Hershey’s on top of the cracker.
  3. Add the marshmallow onto the chocolate.
  4. Place your other half of graham cracker on top.
  5. Wrap your s’more up like a present with the tin foil.
  6. Stick in the toaster oven and put it on the light toast setting.
  7. When done in the toaster oven, unwrap and serve on a plate.

*** CAUTION: Extremely hot yumminess as soon as they come out, but cool off quite fast

smores3wm

TA DA!!!! Your Rainy Day S’more! Will you have S’more after the first?

And here is a picture of chocolate…..because who really doesn’t like a picture of chocolate?

smores1wm

ENJOY!!!

Snowy Days Winter Hat

snowy days

Snowy Days Winter hat pattern is COPYRIGHT to Rachael Hunt 2013. Please do not sell, alter or redistribute this patter as your own. Please feel free to sell your work made from this patter, but please do not use my photos to sell your item. 

Materials:
o DK weight yarn (I used MadelineTosh’s Tosh DK in Spectrum)
o 5mm hook
o 4mm hook
o Tapestry needle

Abbrev. & Stitches used:
o Chain (ch)
o Space (sp)
o Stitch(es) (st(s))
o Slip stitch (sl st)
o Single crochet (sc)
o Back post single crochet (bpsc)
o Puff stitch (ps)

*** If you’re not familiar yet with a Puff Stitch, here is a great and easy to follow tutorial on how to do it:

http://www.stitchdiva.com/tutorials/crochet/puff-stitch

***Quick Note: If you start to think that your hat will be too big, don’t worry, I thought that too, but that is where the 4mm hook comes in 

——->  Starting with the 5mm hook,

Ch 3, sl st to form a ring.

Rnd 1 – inside ring, *ps, ch1 * 7 times. Sl st to first ps to join. (7ps)
Rnd 2 – ch 2, ps, ch1 twice into each ch sp around. Sl st to first ps to join. (14 ps)
Rnd 3 – ch2, *ps, ch1 twice in first ch sp, ps, ch1 in next ch sp* repeat from * to * around. Sl st to first ps to join. (21 ps)
Rnd 4 – ch2, *ps, ch1 twice in first ch sp, ps, ch1 in next 2 ch sp* repeat from * to * around. Sl st to first ps to join. (28 ps)
Rnd 5 – ch2, *ps, ch1 twice in first ch sp, ps, ch1 in next 3 ch sp* repeat from * to * around. Sl st to first ps to join. (35 ps)
Rnd 6 – ch2, *ps, ch1 twice in first ch sp, ps, ch1 in next 4 ch sp* repeat from * to * around. Sl st to first ps to join. (42 ps)
Rnd 7-15 – ch2, ps, ch1 in each ch sp around. Sl st to first ps to join. (42 ps)

——–>     Switch to 4mm hook: this is where your brim will start

Rnd 16 – ch2, *sc in first ps, sc in ch sp* repeat from * to * around. Sl st to top of ch2 to join.

——–>    Switch back to 5mm hook:

Rnd 17 – ch2, bpsc in each st around. Sl st to top of ch2 to join.
Rnd 18-21 – repeat Rnd 17
Rnd 19 – loosely sl st in each st around. Sl st to first sl st to join.

Fasten off and weave in ends.

And that’s all there is to it! A great hat for the chilly months! Make one for yourself and then make more for others! This will be a great Christmas gift!

If you find any mistakes or have any issues, please feel free to leave a comment below 🙂