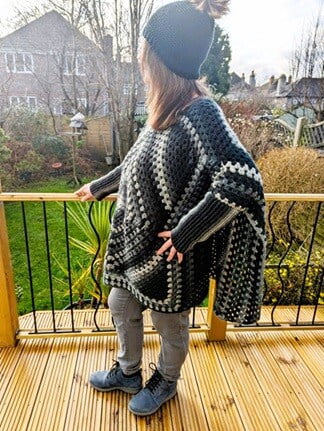
I had so much fun designing this crochet poncho and I love wearing it! I get lots of fab comments out and about and I’m so excited to see what you think of the pattern.

Jera’s Jamboree receives payments for affiliate advertising. This is at no extra cost to you. As an Amazon Associate I earn from qualifying purchases. As a Cratejoy affiliate I earn if you click on a link and shop from my link. Please see my disclosure policy for more information.
Picture this: a chilly evening, a cup of your favourite warm beverage, and you, wrapped in the warmth of a poncho that you made yourself. The Queen of Diamonds Crochet Poncho is not just a garment; it’s a wearable hug!
What sets this poncho apart? Well, not only is it a breeze to create, but I’ve added sleeves, giving an extra layer of coziness. The sleeves add practicality too – you can go about your day without the edges of the poncho getting in the way.

Whether you’re an experienced crocheter or a beginner, this pattern is tailored for everyone and written in sizes for small to 5X.
There’s no need to worry about confusion between US and UK crochet terms – I’ve got you covered. My poncho pattern is thoughtfully written in both terms, ensuring a smooth and stress-free crocheting experience, no matter where in the world you are.

- Why you'll love crocheting this poncho
- How to get this crochet pattern
- Design Inspiration
- Related Crochet Poncho Patterns
- How the crochet poncho pattern is worked
- Related Granny Square Patterns
- Yarn
- Pattern Notes
- Level
- Materials
- Gauge/Tension
- Stitches and Abbreviations
- Measurements and Amount of Yarn
- Purchase the easy-to-read, print-friendly PDF (ad free)
- Testimonials
- Crochet Poncho Instructions (UK Crochet Terms)
- Crochet Poncho Instructions (US Crochet Terms)
- Copyright Notice
Why you’ll love crocheting this poncho
How to get this crochet pattern
Option 1: Keep scrolling to get this pattern for free
Option 2: Purchase the easy-to-read, print-friendly PDF (ad free)
Design Inspiration
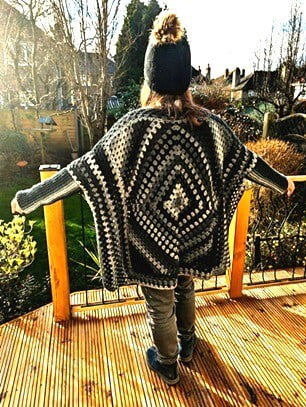
I originally bought the yarn in this project when it was on sale thinking at some point, I would design a cardigan. I tried several stitches to see how it would work up in rows but none of the stitches inspired me – that is until I started crocheting a granny square! I loved the way the different shades of grey granny stitches just popped in amongst the black. It wasn’t such a great leap of imagination to visualise how the square would look with the corners worked and extra rows for different sizes. And adding the sleeves would make the poncho practical. I’m so in love with how it turned out (and hope you will be too)!
This design also inspired a couple more of my patterns – Princess of Diamonds lap blanket pattern looks fab with a scallop border! and Countess of Diamonds shrug pattern which gives it a unique twist.

Related Crochet Poncho Patterns
- Forest Ripple Poncho
- Cotton Candy Poncho
- Victoria Poncho
- Amelia Poncho
- Stylish Crochet Poncho Patterns for every skill level
How the crochet poncho pattern is worked
Instructions are written for sizes S/M, L/XL, 2X/3X, 4X/5X.
Two panels are worked (front and back).
I’ve split the instructions into 4 sections for ease.
A classic granny square is worked in section 1. The corners are worked in decreasing rows in section 2 and then the granny square continues in rounds for section 3.
Section 2 changes the orientation of the square, giving it the diamond shape as in the process images below.

In section 4, the poncho pattern is worked in rows to extend the width.

The sleeves are worked in rows lengthways in the back loop. The ribbing has a lovely stretch and is really comfortable.
Before assembling you will choose the top and the bottom for each panel.
To assemble, the two panels are seamed together working on the wrong side, leaving space for a neckline.
Fitting the sleeves is easy. A stitch marker is used in the centre stitch of each sleeve and matched to the top seam. The sleeves are sewn into place at the shoulder, then both edges of the sleeves folded together, before continuing the seam to the cuff edge as in the process photo below.

Optional
- You don’t have to add the sleeves. After you’ve crocheted your panels, seam the two panels at the top including following the instructions for the neckline.
- Closing the poncho sides – you can choose whether to leave the sides open or to close them to create a sweater. If you decide on side seams, after sewing the sleeves, sew from underarm down to the hem.
Related Granny Square Patterns
- Granny square bag patterns include the Josephine tote, the easy granny square bag or the Canterbury Edition tote.
- If you’re not sure which designs suit your skills, have a browse of this collection of crochet tote bag patterns or these easy granny square bags.
- The Stella granny square cardigan is worked in one large granny square for the back and smaller squares for the front. This made-to-measure cardigan is an easy make.
- You’ll find different designs and constructions in this collection of free granny square cardigans.
- Granny Square Scarf
- Boho Shawl
Yarn
Manarola (World of Yarn) is a soft DK yarn. The fine, silk sheen acrylic is loosely spun and, in my experience, has the same feel and works up similarly to Boho Spirit. I found it really easy to work with.
The yarn has a gradual colour shift which worked so well for this crochet poncho. It makes the design really stand out!
It’s a premium acrylic yarn is OEKO-TEX® certified (no. 2076-311). I’ve washed my poncho at 30°C (86°F) and it’s kept its quality and shape. You can’t tumble dry it though. I’ve hung my poncho over a radiator, on a clothes drier and also on a coat hanger and it’s kept the shape.
I bought my yarn from Hobbii but if you can’t get hold of any, suitable substitutes include:
| Brand | World of Yarn |
| Content | 100% premium acrylic |
| Weight | 100g (3.5oz) |
| Yarn Length | 240m / 262yds |
| Yarn Weight | DK |
| Recommended Crochet Hook | 4mm (US G-6) – 4.5mm (US 7) |
| Care Instructions | Machine wash 30°C (86°F) / Do not tumble dry |

Pattern Notes
- Sizes are written thus S/M, (L/XL, 2X/3X, 4X/5X)
- Chain 3 counts as a stitch
- Chain 4 counts as a stitch
- Rounds are joined with a slip stitch to the top of the turning chain
- Section 1 classic granny square is worked in rounds
- Section 2 corners are worked in decreasing rows
- Section 3 first round is to set up to continue working the granny square in rounds
- Section 4 extension for individual size widths worked in rows
- Sleeves – starting chain is the length and the rows are the width
- Sleeves – chain 1 does not count as a stitch
- Sleeves have no right or wrong side
- Weave in ends as you go
- Assembly – make sure the extension rows in section 4 are the poncho side edges before seaming the top of both panels together
- If you substitute the yarn, you may need more or less than I used. Always use the yardage amounts (as opposed to grams) as not all grams of the same fibres have the same length of yarn
Level
Easy

Materials
- 4mm / G6 Crochet Hook (these crochet hooks are my go to)
- Manarola color 8 or yarn that meets gauge – S/M 1651yds / 700g; L/XL 2010yds / 800g; 2X/3X 2370yds / 1000g; 4X/5X 2730yds / 1100g
- Stitch Markers (these are my favourites)
- Scissors
- Yarn Needle
Gauge/Tension
6 rounds = 10cm X 10cm
Stitches and Abbreviations
| UK Crochet Terms | US Crochet Terms |
| Double Crochet (dc) | Single Crochet (sc) |
| Treble Crochet (tr) | Double Crochet (dc) |
| Double Treble Crochet (dtr) | Treble Crochet (tr) |
- Back Loop Only (blo): working in the back loop of the stitch
- Chain (ch)
- Slip Stitch (sl st)
- Space/s (sp/s)
- Repeat (rep)
- Skip (sk)
- Yarn Round Hook (yrh)
- Right Side (RS)
- Wrong Side (WS)
- Opposite (opp)
Measurements and Amount of Yarn
| Size | Poncho Panel Width (cm) | Poncho Panel Length (cm) | Manarola Yarn including sleeves (yards/grams) |
| S/M | 88 | 68 | 1651 / 700g |
| L/XL | 108 | 68 | 2010 / 800g |
| 2X/3X | 128 | 68 | 2370 / 1000g |
| 4X/5X | 148 | 68 | 2730 / 1100g |

Purchase the easy-to-read, print-friendly PDF (ad free)
Included in the 16 page PDF crochet poncho pattern is:
- how the pattern is worked
- pattern notes
- clear written instructions
Testimonials

Screenshot above shows a 5 star review from a customer on Etsy. “Pattern is very well written. One of the best patterns I’ve seen in a while. Very happy with my purchase.” 10 Feb 2024
Crochet Poncho Instructions (UK Crochet Terms)
Make 2
Section 1 – classic granny square worked in rounds
Ch4, join with a sl st to 1st ch to form a ring
Round 1: ch3, 2tr, ch2, * 3tr, ch2, * rep 2 more times, sl st to top of ch3, sl st to corner sp, ch3
Round 2: [2tr, ch2, 3tr] in corner sp, *ch1, [3tr, ch2, 3tr] in corner sp, * rep around, ch1, sl st to top of ch3, sl st to corner sp, ch3
Round 3: [2tr, ch2, 3tr] in corner sp, *ch1, 3tr in ch1-sp, ch1, [3tr, ch2, 3tr] in corner sp, * rep to last corner sp, ch1, 3tr in ch1-sp, ch1, sl st to top of ch3, sl st to corner sp, ch3
Round 4: [2tr, ch2, 3tr] in corner sp, *ch1, 3tr in ch1-sp, ch1, 3tr in ch1-sp, ch1, [3tr, ch3, 3tr] in corner sp, * rep to last corner sp, ch1, 3tr in ch1-sp, sl st to top of ch3, sl st to corner sp, ch3
Round 5: rep round 4 working [3tr, ch2, 3tr] in corner sps, ch1 before and after corner sps, 3tr in ea ch1-sp, ch1 before and after each 3tr
Round 6 – 15: rep round 4
Round 16: rep round 4, ch4, turn
Do not fasten off
Section 2 – working the corners in decreasing rows (see process photos in ‘How the crochet poncho pattern is worked section’)
Row 1: sk 3 tr of corner sp, [3tr, ch1] in ea ch1-sp to final ch1-sp, 3tr in final ch1-sp, dtr in ch2-sp of corner, ch4, turn
Row 2: sk 3 tr, [3tr, ch1] in ea ch1-sp to final ch1-sp, 3tr in final ch1-sp, dtr in final st, ch4, turn
Rows 3 – 14 : rep row 2
Row 15: yrh, insert hook in ch1-sp, yrh, pull up a loop, yrh, pull through 2 loops, yrh twice, insert hook in final dtr, yrh, pull up a loop, yrh, pull through 2 loops twice, yrh, pull through all loops on hook
Fasten off
Rep for the remaining 3 sides, rejoining yarn with WS facing in any ch2-sp
Section 3 – continuing to work the granny square in rounds
Working on RS, rejoin yarn to any corner
Round 1 (working into ch4-sps from section 2): ch3, [2tr, ch2, 3tr] in same sp, *2tr in ea ch-4 sp to corner, [3tr, ch2, 3tr] in corner sp, * rep around join with sl st to top of ch3, sl st to corner sp, ch3
Round 2: [2tr, ch2, 3tr] in corner sp, [ch1, sk 2 sts, 3tr in next st] rep to corner sp, * [3tr, ch2, 3tr] in corner sp, ch1, sk 2 sts, 3tr in next st, ch1, * rep around, join with sl st to top of ch3, sl st to corner sp, ch3
Round 3 – 5: rep round 3 from section 1
Round 6: rep round 3 from section 1, ch4, turn
Do not fasten off
Section 4 – extending width on both sides working in rows
Row 1: sk 3 tr, *3tr in ch1-sp, ch1, *rep to corner sp, dtr in corner sp, ch3, turn
Row 2: 2tr in corner sp, ch1, *3tr in ch1-sp, ch1, *rep to last sp, 2tr in last sp, ch3, turn
Row 3: 2tr in 1st ch-sp, ch1, *3tr in ch1-sp, ch1, *rep to last st, tr in last st, ch3, turn
Row 4 to 9, (15, 21, 27) rep row 3
Fasten off.
With RS facing, rejoin yarn on opp side in ch2 corner-sp
Rep rows 1 to 9, (15, 21, 27)
Fasten off
Sleeves (all sizes) make 2
Ch 43
Row 1: dc 2nd ch from hook, dc across, ch1, turn
Row 2: dc in base of ch1, dc blo to last st, dc in last st, ch1, turn
Rows 3 – 54: rep row 2
Fasten off
Assembly
Choose which is the top and which is the hem of your poncho on both panels.
Place both panels together with RS facing inwards
Top Seam and Neckline
Identify the middle st along the top and place a st marker. Measure 11.5cm either side and place a st marker.
Remove the middle st marker
Sew seam through both panels from the st marker to the edge of the poncho for left and right.
Sleeves
Working on WS of panels, lay out front and back as in process photo in ‘How the crochet poncho pattern is worked.’
Identify the middle st of the sleeve, line up with the shoulder seam and place a st marker. Pin or use st markers to secure width of sleeve to the poncho panel. Sew seam.
Fold both edges of sleeve together and continue to sew to the cuff edge.
Fasten off
Rep for the sleeve on the opposite side.

Crochet Poncho Instructions (US Crochet Terms)
Make 2
Section 1 – classic granny square worked in rounds
Ch4, join with a sl st to 1st ch to form a ring
Round 1: ch3, 2dc, ch2, * 3dc, ch2, * rep 2 more times, sl st to top of ch3, sl st to corner sp, ch3
Round 2: [2dc, ch2, 3dc] in corner sp, *ch1, [3dc, ch2, 3dc] in corner sp, * rep around, ch1, sl st to top of ch3, sl st to corner sp, ch3
Round 3: [2dc, ch2, 3dc] in corner sp, *ch1, 3dc in ch1-sp, ch1, [3dc, ch2, 3dc] in corner sp, * rep to last corner sp, ch1, 3dc in ch1-sp, ch1, sl st to top of ch3, sl st to corner sp, ch3
Round 4: [2dc, ch2, 3dc] in corner sp, *ch1, 3dc in ch1-sp, ch1, 3dc in ch1-sp, ch1, [3dc, ch3, 3dc] in corner sp, * rep to last corner sp, ch1, 3dc in ch1-sp, sl st to top of ch3, sl st to corner sp, ch3
Round 5: rep round 4 working [3dc, ch2, 3dc] in corner sps, ch1 before and after corner sps, 3dc in ea ch1-sp, ch1 before and after each 3dc
Round 6 – 15: rep round 4
Round 16: rep round 4, ch4, turn
Do not fasten off
Section 2 – working the corners in decreasing rows (see process photos in ‘How the crochet poncho pattern is worked section’)
Row 1: sk 3 dc of corner sp, [3dc, ch1] in ea ch1-sp to final ch1-sp, 3dc in final ch1-sp, tr in ch2-sp of corner, ch4, turn
Row 2: sk 3 dc, [3dc, ch1] in ea ch1-sp to final ch1-sp, 3dc in final ch1-sp, tr in final st, ch4, turn
Rows 3 – 14 : rep row 2
Row 15: yrh, insert hook in ch1-sp, yrh, pull up a loop, yrh, pull through 2 loops, yrh twice, insert hook in final tr, yrh, pull up a loop, yrh, pull through 2 loops twice, yrh, pull through all loops on hook
Fasten off
Rep for the remaining 3 sides, rejoining yarn with WS facing in any ch2-sp
Section 3 – continuing to work the granny square in rounds
Working on RS, rejoin yarn to any corner
Round 1 (working into ch4-sps from section 2): ch3, [2dc, ch2, 3dc] in same sp, *2dc in ea ch-4 sp to corner, [3dc, ch2, 3dc] in corner sp, * rep around join with sl st to top of ch3, sl st to corner sp, ch3
Round 2: [2dc, ch2, 3dc] in corner sp, [ch1, sk 2 sts, 3dc in next st] rep to corner sp, * [3dc, ch2, 3dc] in corner sp, ch1, sk 2 sts, 3dc in next st, ch1, * rep around, join with sl st to top of ch3, sl st to corner sp, ch3
Round 3 – 5: rep round 3 from section 1
Round 6: rep round 3 from section 1, ch4, turn
Do not fasten off
Section 4 – extending width on both sides working in rows
Row 1: sk 3 dc, *3dc in ch1-sp, ch1, *rep to corner sp, tr in corner sp, ch3, turn
Row 2: 2dc in corner sp, ch1, *3dc in ch1-sp, ch1, *rep to last sp, 2dc in last sp, ch3, turn
Row 3: 2dc in 1st ch-sp, ch1, *3dc in ch1-sp, ch1, *rep to last st, dc in last st, ch3, turn
Row 4 to 9, (15, 21, 27) rep row 3
Fasten off.
With RS facing, rejoin yarn on opp side in ch2 corner-sp
Rep rows 1 to 9, (15, 21, 27)
Fasten off
Sleeves (all sizes) make 2
Ch 43
Row 1: sc 2nd ch from hook, sc across, ch1, turn
Row 2: sc in base of ch1, sc blo to last st, sc in last st, ch1, turn
Rows 3 – 54: rep row 2
Fasten off
Assembly
Choose which is the top and which is the hem of your poncho on both panels.
Place both panels together with RS facing inwards
Top Seam and Neckline
Identify the middle st along the top and place a st marker. Measure 11.5cm either side and place a st marker.
Remove the middle st marker
Sew seam through both panels from the st marker to the edge of the poncho for left and right.
Sleeves
Working on WS of panels, lay out front and back as in process photo in ‘How the crochet poncho pattern is worked.’
Identify the middle st of the sleeve, line up with the shoulder seam and place a st marker. Pin or use st markers to secure width of sleeve to the poncho panel. Sew seam.
Fold both edges of sleeve together and continue to sew to the cuff edge.
Fasten off
Rep for the sleeve on the opposite side.
Happy crocheting!
Copyright Notice
The pattern and photographs of this design are the property of Sharon Goodwin at Jera’s Jamboree. This pattern and design are subject to copyright and are for personal, non-commercial use only. You may not share, resell, alter or redistribute this pattern in part or in whole. You may, however, sell any finished items you make. If you would like to include this pattern in a roundup, you may take one photo and link back to this pattern.