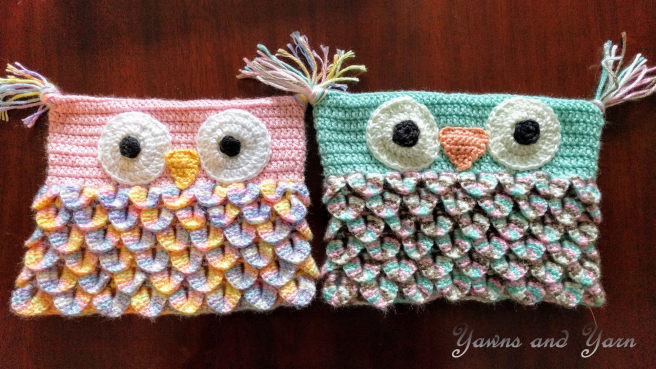
Hello, everyone! I know it’s been a while, but there has been very little time for crocheting anything new with my two little people running around and destroying my house. Luckily, my brain is still firing up every now and then and giving me new ideas to try! My latest idea is an owl hat that uses crocodile stitches to create a feathered look.
I suggest that if you are unfamiliar with the crocodile stitch, that you check out a tutorial on YouTube. I liked this one by Nadelspiel, but be careful because the tutorial does not use the same stitches, or amount of stitches, as my pattern below. This is just to help you learn how to work this wonky stitch. The crocodile stitch can be very intimidating, but once you get the hang of it, it might just be one of your favorites!
** If you’d like to bookmark this pattern on ravelry, you can find it here!
Now, for a little back-story on how I made the two pictured hats, I will tell you that the pink hat was made using a G-hook and a longer starting chain (96) because this was my first attempt, and the green hat was made using an H-hook. They turned out to be almost the exact same size. I have a VERY tight stitch, so most people will need to use a G-hook, and follow the below pattern with a starting chain of 90 stitches (I dropped the stitch count and used a larger hook because 96 stitches is A LOT of stitches!), to make a good sized kids hat. If you have a crazy tight stitch (you’ll know if you’ve ever tried to make a hat using an adult sized pattern and it turns out to fit a newborn), then use an H-hook!
******* UPDATED 1/19/2018 ******* I have heard from the first person to try my pattern, outside of my tester, and she has mentioned that the starting chain of 90, even with a G-hook, is just coming out way too big. I understand. I know my stitch is oddly tight… as an example, I made a hat with an adult sized pattern and it fit a one year old perfectly. I appreciated the feedback, so I am including a note here on starting stitch count. Each crocodile stitch requires a length of 6 stitches. So, if 90 is just a bit too big, try a starting chain of 84. This will give you 14 crocodile stitches in each row. If that is too big, take the starting chain to 78. This will give you 13 crocodile stitches in each row. Just remember that the width of the hat will need to measure 9.5-10″ across. You want to be sure the crocodile stitches do not spread when the hat is worn, or else it really takes away from the look.

I have to give a huge shout out to Yeeli for helping me test this pattern! Without her help, this would have been a hugely confusing mess! Turns out that pattern writing is not my strong suit! Go check out her beautiful crocheted items on Facebook at Yeeli’s Little Corner!
Things you need:
**I used Caron Simply Soft (green hat) and Stitch Studio by Nicole (pink hat) to make these hats. Caron is a worsted weight 4 and Stitch Studio is a worsted weight 3 (typically called DK weight), but since Caron is pretty thin, they ended up working up the exact same way. I will note that I started working one up in a typical worsted weight 4 yarn, Vanna’s Choice, with and H hook, and the hat was a good 1/2 bigger across when lying flat. It’d be a good choice if you’d like to make and adult sized hat though!
- 1 skein of variegated yarn
- 1 skein of a complimentary color
- A little bit of white yarn for the eyes
- A little bit of black yarn for the pupils
- A little bit of yellow or orange yarn for the beak
- H Hook (if you have a tight stitch) and G Hook (if you have a loose stitch and for the eyes and beak)
- Tapestry Needle
Stitches Used:
- Chain (ch)
- Single Crochet (sc)
- Slip Stitch (slst)
- Double Crochet (dc)
- Treble Crochet (tr)
**Gauge: (Remember, these are made with an incredibly tight stitch. If you’re not coming close, please go down a size hook (if yours is too big) or up a size in hook (if yours is too small), or change the amount of the starting chain to reach as close to the gauge as you can. The hat is made to fit a toddler or a child, (fits my almost 2 year old and my 4.5 year old perfectly).
- H hook hat – Finished hat size = 9.5″ x 7.5″
- 4 Crocodile Stitches – 5″ x 1.25″
- DC 2×2″ block – 9 stitches wide by 5 rows tall
The Pattern:

- Starting with variegated yarn – Chain 90 (if this is turning out to make a hat that is just way too big, even with a G-hook, then you can go down in increments of 6. So, a starting chain of 84 (14 crocodile stitches), or 78 (13 crocodile stitches), depending on how much smaller you need to go) and join chain together with a slst into first chain. Make sure your chain is not twisted
- Row 1 – Ch 1, 1 sc in each chain, join to ch 1 (90)
- Row 2 – Chain 4, tr stitch in same st (counts as your first V-Stitch), *ch 1, skip 2 st, 1 tr st in next stitch, ch 1, skip 2 st, 1tr-ch1-1tr in same st* *Continue around. You will skip the last two stitches and slst to the 3rd chain space in your first chain 4 to join. You should have 15 V-Stitches and 15 Single Treble Stitches.
- Row 3 – Ch 3 (counts as first DC), 5 dc around first post of the V Stitch, Ch 1, 6 dc around second post in V-Stitch. (This is your first crocodile Stitch or “feather”), slst into top of single tr, *6dc around first post of next V-Stitch, ch1, 6dc around second post of V-Stitch, slst into the top of the next single tr* *Continue around until you’ve slip stitched into the final single tr.
- Rows 4 – Chain 4 and tr into same stitch (first V-stitch of row 4), ch 1, tr into the space in the middle of the crocodile stitch, ch 1, *V-Stitch (tr-ch1-tr) in the top of the single tr stitch from the previous row, ch 1, tr into the middle of the next crocodile stitch, ch 1* *Continue around and finish with a slst into the 3rd chain on the first chain 4.

- Row 5 – Repeat row 3
- Row 6-13 – Repeat rows 4 and 3 until you have 6 rows of crocodile stitches.
- Row 14 – **Switch to solid colored yarn** Chain 2 (counts as first dc) – DC in each stitch around ** A helpful tip here is that each crocodile stitch has 6 stitches across the top, so 6×15 will give you your 90 dc’s needed.** slst to the top of chain 2 to join. (90)
- Row 15-20 – DC in each stitch around. Cut yarn, leaving enough to weave in your end. Weave in all ends on the hat so far (makes it easier when sewing on the eyes and beak so your ends don’t get tangled).
Eyes: Make two!
- With White Yarn and G-hook – Chain 3 – slst into ch1 space
- Row 1 – Chain 2 (counts as first dc), 10 dc in circle. Slst to chain 2. (11)
- Row 2 – Chain 2 (counts as first dc), 2 dc in each stitch around. Join to chain 2 space. (22)
- Row 3 – Chain 2 (counts as first dc), 2 dc in next stitch, *1 dc in next stitch, 2 dc in next stitch* *Continue until end. Join to chain 2 space. (33)
- Leave a long tail for sewing onto owl.
Pupils:
- With Black Yarn and G-Hook – Chain 3 – slst into ch1 space
- Row 1 – Chain 1, 10 sc into circle. (11)
- Leave a longish end for sewing onto the white part of the eye.
Beak:
- With Yellow or Orange Yarn and a G-Hook – chain 9, sc in 2nd chain from hook, sc in next 7 chain spaces (8)
- chain 1 (you chain 1 will count as the first stitch in this and all following rows), turn, sc in next 7 stitches (8)
- chain 1, turn, sc in next 5 stitches, sc2tog (7)
- chain 1, turn, sc in next 4 stitches, sc2tog (6)
- chain 1, turn, sc in next 3 stitches, sc2tog (5)
- chain 1, turn, sc in next 2 stitches, sc2tog (4)
- chain 1, turn, sc in next stitch, sc2tog (3)
- chain 1, turn, sc2tog (2)
- chain 1, slst in next stitch (1)
- leave a long tail for sewing onto owl
To finish the hat:
Start by sewing on the beak in the middle of the front of the hat (the back of the hat will have the seam down the middle).

Next, you can either sew the pupil onto the eye, and then sew the finished eye onto the hat, or, you can sew the white part onto the hat and then the sew the pupil on. Sometimes sewing the pupil on last will help keep the eye from any popping or puckering.
After you’re finished sewing on the beak and eyes, you will whip stitch the top of the hat closed. This tutorial is great to watch if you haven’t tried it before!
I do ear tassels a little different. You can make actual tassels, if you’d like. I’ve never tried them, so I have no helpful tips. What I do is I cut 8 pieces of yarn at 8″ long for each side (so 16 pieces total). I then fold the 8 pieces in half, and pull the center through the corner of the hat with my hook. After the middle is through, put your fingers into the loop, and pull the ends through until they are tight. I’ve had no problems keeping pieces on my hats or amigurumi toys by doing this, and it’s super simple! Here are some pictures of this being done on a fleece blanket for a good visual.
Now you are done! Your little one can now enjoy their adorable owl hat, and you can rest your weary, sore crocodile stitch fingers.

** Please feel free sell any hats made using this product, but please give credit for my pattern when doing so. **

These are super, super cute!!! I’m making hats for children with cancer, but I want them to be cute and fun and these are perfect!!!
Your pattern is very easy to follow.
Thank you!!!
LikeLike
Oh that is SO AMAZING to hear!! What an absolutely wonderful way to share your talents! So glad the pattern is easy to follow, I’m fairly new to pattern writing, so it always makes me nervous! 🙂 Keep up your amazing work!
LikeLike
Made an owl cocoon for my new grandson in this crocodile stitch and was looking for an idea for a hat to go with it when I came across your pattern. Played around and managed to make a tiny one which was ideal. I also made a bigger one for my 2 year old grandson. Adapted it slightly in that I only cast on 78 sts and used 3 different hook sizes and it came out brilliantly. I have posted pics. I have a shop on Etsy where I sell hand crocheted items and I think this will be an item that should sell well. I’ll definitely give you full credit for this fantastic pattern when I put them up. Many thanks
LikeLike
That is so great to hear! I’d love to see pictures! 😍
LikeLike